A realistic dandelion tattoo isn’t just a pretty flower. Done right, it captures that fragile moment before the seed head breaks apart, those delicate pappus filaments catching light like tiny parachutes. I’ve tattooed dozens of these over the years, and they remain one of the most technically demanding botanical subjects. The contrast between the dense, textured seed head and the wispy, almost weightless filaments separates a mediocre dandelion from one that makes people stop and stare.
Origins & History
Dandelions as tattoo motifs exploded in the early 2010s, right around when Pinterest started driving tattoo trends hard. Before that, you’d see them occasionally in watercolor-style pieces, but the realistic approach really took hold when artists started pushing photorealism in botanical work. I’ve got a client who came in back in 2014 with a blown-up macro photograph she took herself, wanted every filament rendered exactly. That was the turning point in my shop; we started treating these like portrait work, not flash.
Symbolism vs. Aesthetic
Most clients come in talking about “wishes” or “blowing seeds to the wind.” I don’t push back on that, it’s their skin, their story. But the artists I know who specialize in these? We’re obsessed with the visual challenge. The symbolism is almost secondary to getting those filaments to read as translucent, as catching actual light. That said, the resilience narrative fits: dandelions grow through concrete, survive mowing, refuse to die. I’ve had cancer survivors, people leaving abusive relationships, new parents, all drawn to that stubborn life force.
Botanical Realism Movement
The larger trend toward scientific illustration-style tattoos lifted dandelions up with it. Artists like Kelly Violet and the UK botanical crew showed that flowers could be accurate, not just decorative. Realistic dandelions benefited because they’re instantly recognizable even in hyper-detailed form. A rose can get stylized to hell and still read; a dandelion loses its identity fast if you simplify too much. That constraint forced technical innovation.
Key Characteristics & Motifs
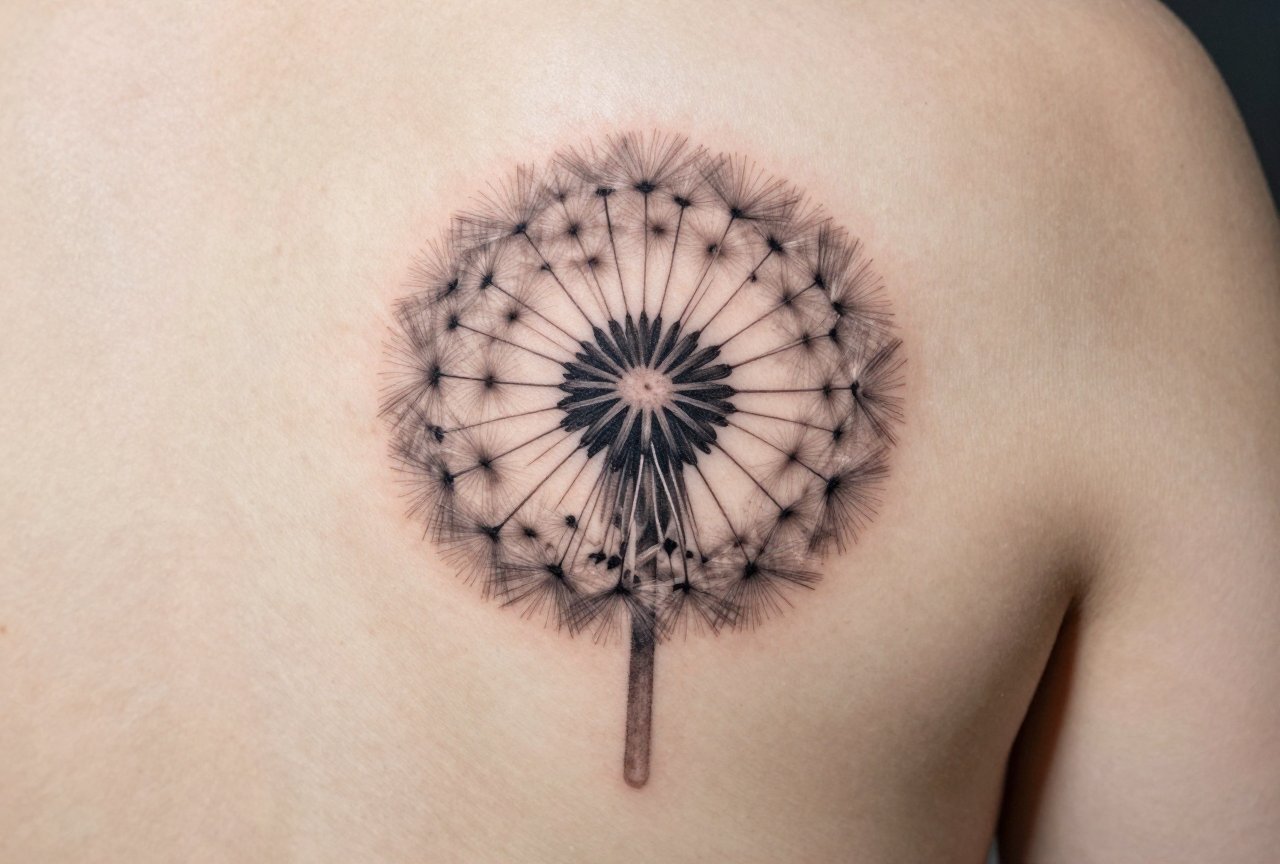
What separates a realistic dandelion from a cartoonish one? It’s all in the transitions. The receptacle, that cup-shaped base, has this weird, almost architectural geometry. Then the filaments: hundreds of them, each with a tiny achene at the base, tapering to near-invisibility. In my chair, I spend more time mapping negative space than laying ink.
- Intact seed head: The full sphere, pre-blow. Dense, geometric, almost alien up close.
- Mid-dispersal: Most popular. Some filaments still attached, others drifting. Creates natural movement lines.
- Single achene detail: Macro view of one seed with its parachute. Surprisingly effective as small work.
- Root and leaf inclusion: The jagged leaves add textural contrast. I love doing these in black and grey while keeping the seed head delicate.
- Deconstructed filaments: Seeds that have already blown, rendered as scattered elements across a larger composition.
The “seeds transforming into birds” thing? I get asked about it weekly. It’s not my taste, too literal, too 2012, but I’ll do it if the drawing’s clean. What I won’t do is blowout city: those filaments need single-needle or tight three-needle work, and if your artist goes too heavy, you get fuzzy worms instead of hair-fine lines.
Color vs Black and Grey
This is where shop debates get heated. I run black and grey in my dandelions about 70% of the time. The natural color of pappus is basically white-to-cream, which means you’re either leaving skin tone negative space or pushing yellow-white ink that ages unpredictably.
Black and Grey Advantages
Skin tone does the heavy lifting for “white” filaments. I build the seed head with concentrated blacks and soft greys, then let the untouched skin read as the light-catching fibers. Heals cleaner. Ages better. The contrast between dense darks and bright negative space gives that photographic pop. I’ve got a dandelion on my own forearm from six years back, still reads, still gets comments, because we planned the skin-as-highlight approach from the stencil stage.
Color Approaches
When color works, it’s usually restrained. A muted yellow-green in the receptacle base. Maybe a whisper of violet in the shadows for depth. The blown-seeds-into-birds crowd often wants watercolor backgrounds, splashes of blue, pink, sunset tones. I do these with extreme caution. Color saturation in dandelion work fights against the subject’s natural delicacy. Too much and you’ve got a flower-shaped bruise, not a floating seed.
One exception: the Taraxacum in bloom stage. Yellow petals, green sepals, that weird hollow stem. I’ve done a few split designs, blooming flower at bottom, dispersing seeds at top, that use color more naturally. But the classic “wish” dandelion? Black and grey wins in my book.
Best Placements
Dandelions need space for those filaments to breathe. I’ve seen them crammed into 2-inch ankle spots and they always look like fuzzy spiders. Minimum 4-5 inches for a readable seed head with detail. Here are the placements that actually work:
- Outer forearm: Classic. Flat surface, good visibility, filaments can extend toward wrist or elbow for flow.
- Shoulder to upper arm: The curve helps the spherical seed head read dimensionally. I’ve wrapped filaments around deltoids that look like they’re catching actual wind.
- Ribcage side: Painful, but the long vertical space suits the dispersal composition. Seeds floating upward toward armpit.
- Thigh: Big canvas, less pain, easy to heal. I did one last month where seeds trail down toward the knee, gorgeous movement.
- Behind ear: Only for tiny single-seed designs. The intact seed head is too complex for this spot.
Placement affects aging significantly. Forearms get sun. Shoulders rub on bra straps. I tell clients: if you want this to last, plan for touch-ups and use sunscreen like your life depends on it. Those hairlines are the first thing to soften.
Who It Suits
Not everyone. I say this with love. Dandelion tattoos attract a specific personality: often first-timers, often women, often people who want “meaningful” without aggressive imagery. That’s fine. But the realistic style demands commitment. This isn’t a 20-minute walk-in. Sessions run 3-5 hours for a proper seed head. Pain tolerance matters. Budget matters, good botanical realism isn’t cheap.
Skin tone matters too. On very dark skin, the negative-space-filament approach needs adjustment. I’ve worked with artists who specialize in darker skin tones to adapt: using warm grey washes instead of pure skin-tone reliance, building filaments with subtle stipple rather than pure line. It takes longer. It costs more. But it works. Any artist who says “realism doesn’t work on dark skin” is lazy, not honest.
Modern Variations
The style keeps evolving. I’m seeing three directions that excite me:
Scientific Illustration Hybrid
Cross-sections, labeled parts, the whole Linnaean treatment. One client wanted the seed head rendered as if under electron microscope, those geometric patterns in the pappus wall visible. We did it. Took two sessions. Looks like nothing else.
Motion and Time-Lapse
Multiple seed heads in sequence: intact, mid-blow, nearly bare. Creates narrative across a larger piece. I’ve done this as a full sleeve element, transitioning into other wildflowers. The dandelion becomes a clock, a calendar.
Negative Space Mastery
Some artists are pushing the filaments to extreme lengths, 8, 10 inches of barely-there grey wash, essentially tattooing air. Risky for longevity, stunning when fresh. I experiment with this on willing clients, always with the “this will soften significantly” disclaimer.
Choosing an Artist
This is where I get serious. Not every realism artist can do botanicals. Not every botanical artist can do the specific challenge of dandelion filaments. Look for:
- Single-needle confidence: Ask directly: “Do you use single needle for hairline detail?” If they hesitate, keep looking.
- Healed photos: Anyone can make a fresh tattoo look crisp. Ask to see their work at 6 months, 2 years. The filaments tell the truth.
- Botanical portfolio depth: One dandelion in their feed doesn’t mean specialization. Look for variety: leaves, stems, different stages.
- Stencil approach: Good dandelion work requires precise stencil placement for negative space. If they freehand the whole thing, I’m skeptical.
I turn down dandelion requests sometimes. If someone’s budget is tight and they want a 3-inch piece with full detail, I’ll be straight: “This won’t age well at that size. Let’s do one perfect seed, or go bigger.” The artists who say yes to everything are the ones filling Facebook groups with “my tattoo blew out, what happened?” posts.
Final Thoughts
A realistic dandelion tattoo done well is a quiet masterpiece. It doesn’t shout. It catches light, catches eyes, catches that specific moment before everything disperses. I’ve watched clients cry in my chair, not from pain, from seeing something fragile rendered permanent. That’s the job. That’s why we do this.
But it demands respect. Respect for the technical challenge. Respect for how it’ll live in skin over decades. Respect for the artists who’ve pushed this humble weed into legitimate art form. If you’re considering one, take your time finding the right person. Bring reference photos that show what you actually want, not Pinterest composites. And trust the process: the stencil always looks sparse, the mid-session always looks weird, the healed result is where the magic lives.
I’ve got a waiting list for dandelions right now. That tells you something. In a shop culture obsessed with bold traditional and dark blackwork, the delicate stuff still draws people in. Maybe because it is delicate. Because it doesn’t last forever, not perfectly, and that impermanence is the whole point. You blow the seeds. They scatter. You carry the moment.
Frequently Asked Questions
How long does a realistic dandelion tattoo take to heal?
Most of my clients are through the worst peeling in 10-14 days, but those fine filament lines stay sensitive longer. I tell people to expect 4-6 weeks before the skin truly settles and you see the final grey values. The first month, moisturize lightly and don’t pick, those hairlines lift easy.
Will the white filaments disappear as I tan or my skin changes?
Yes, that’s the reality. The “white” in black and grey dandelions is your skin tone. If you tan significantly, the contrast drops. I always warn clients: this tattoo is sunscreen-dependent. Those who ignore that advice come back in two years asking why it looks muddy.
Can you cover up an old dandelion tattoo with a new realistic one?
Usually no. The fine negative-space technique needs clean skin to work. Old dandelion blowouts or heavy filaments block that approach. Sometimes we can integrate into a larger piece, but covering with another realistic dandelion? Rarely works. Laser lightening first is the honest answer.
Why do some dandelion tattoos look like spiders after healing?
Heavy-handed linework. Those filaments should be single-needle or tight three-needle at most, with extremely light pressure. Artists who treat them like tribal lines or use too large a grouping create thick, dark healed marks. The spider look is basically blowout and overwork combined. Always check healed photos before booking.
