Finger mehndi designs carry more of the hand than people expect. A few clean rings, dots, or vines can make the whole hand feel finished.
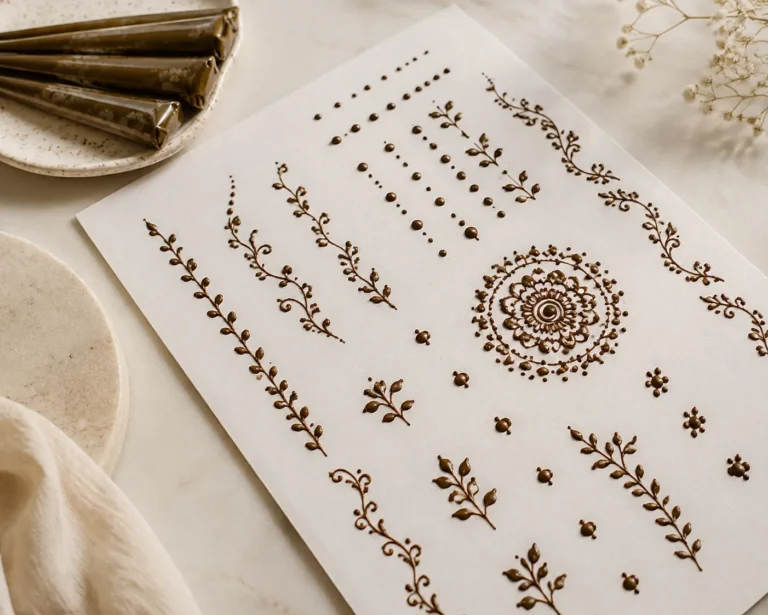
Quick answer: Good finger mehndi designs include ring bands, dot trails, fingertip fills, leaf vines, chain patterns, negative-space stripes, and tiny florals connected to wrist or palm motifs.
Finger mehndi ideas
Finger patterns should repeat enough to feel related, without making every finger identical.
| Option | Best use | Keep in mind |
|---|---|---|
| Ring bands | Jewelry effect | Keep spacing even |
| Dot trails | Beginner-friendly detail | Dots can look messy if rushed |
| Leaf vines | Soft finger flow | Do not crowd joints |
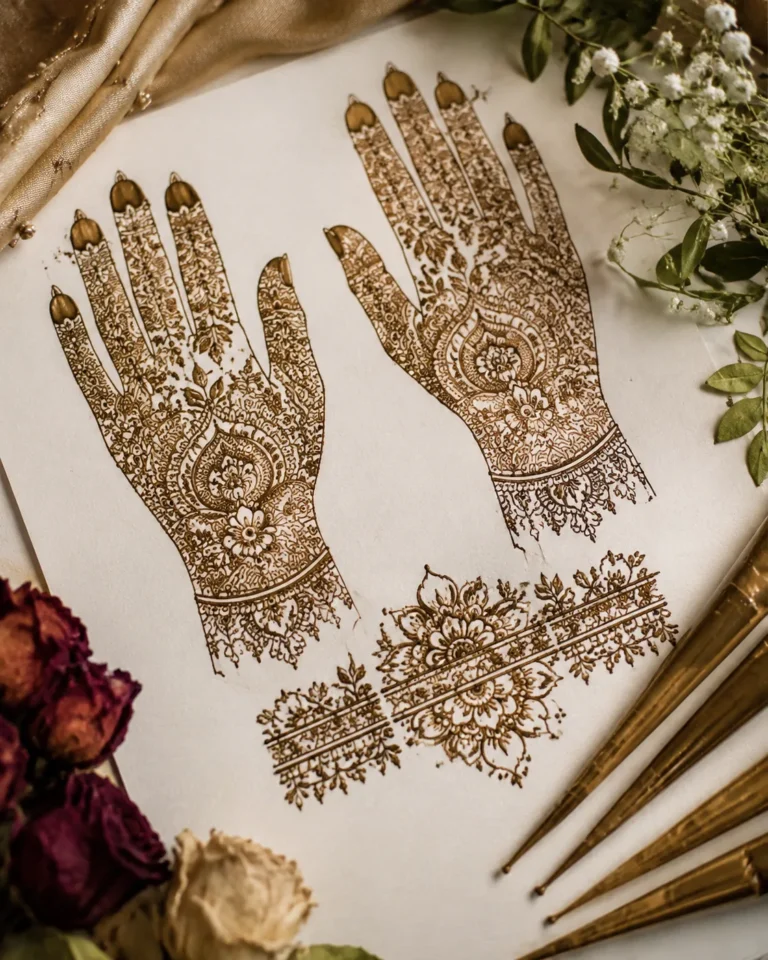
| Fingertip fill | Traditional density | Can feel heavy |
| Negative-space stripe | Modern look | Edges must be clean |
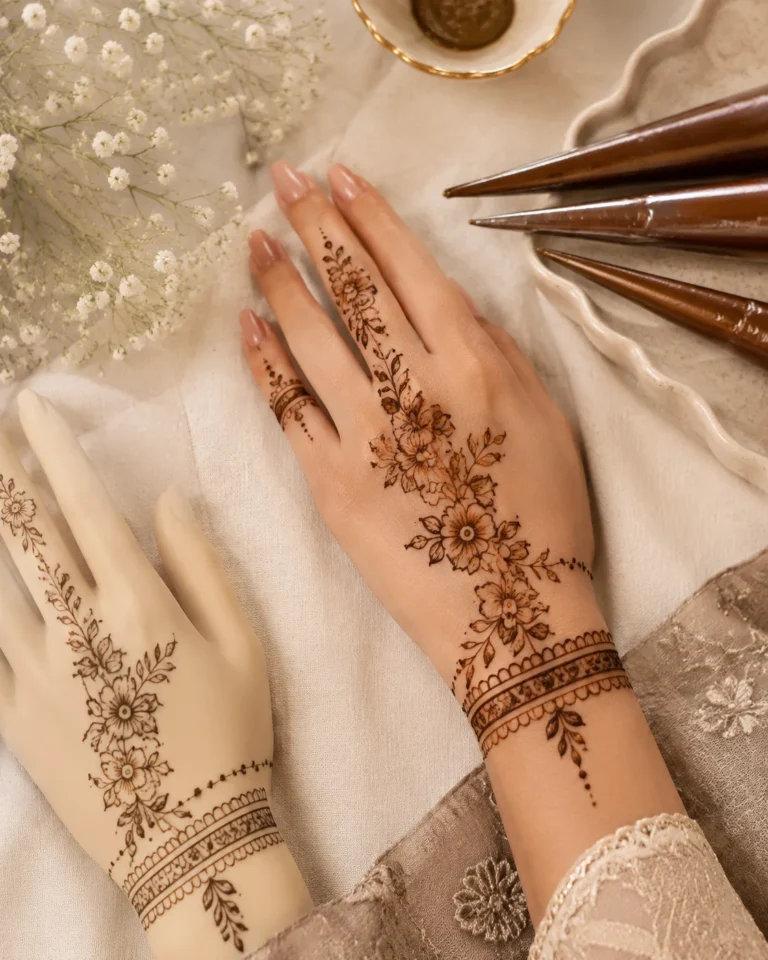
Finger mehndi works best when you keep the design zone-specific. The upper knuckles handle fine geometric lattices, chevrons, and thin floral vines really well because the skin there stretches less during movement. The lower knuckle creases are high-wear, so keep those sections bold and simple rather than cramming in micro-detail that’ll blur out within days.
Ring and middle fingers are the most popular canvas because they read clean from arm’s length. Pinky designs need to stay minimal, maybe a single vine or dot cluster, since the skin surface is narrow and tight. Thumb mehndi tends to smear fastest given how often you grip things, so plan for a design that still looks intentional even after it fades by 30 percent.
What makes this work on real skin
Fingers move constantly, if the linework can't survive a handshake, it was never built to last.
Fingers move constantly, so the design should allow bending and natural gaps. Mehndi does not have to cover every knuckle to look complete.
A strong wrist or palm design can be ruined by chaotic fingers. Keep the finger language consistent.
Finger skin is thin and packed with nerve endings, but the bigger issue for mehndi is that it’s constantly moving, washing, and gripping. Henna stains darker on palms than on the backs of fingers because the palmar skin has more keratin. Expect the back-of-finger color to come in a medium rust-brown rather than the deep burgundy you’d get on a palm center.
Skin hydration matters a lot here. Dry, cracked knuckle skin soaks up henna unevenly and produces a patchy stain. Moisturize your hands for a few days before application, then stop lotions for 24 hours right before so the paste can grip properly. Oils like eucalyptus or clove applied over dried paste push the dye deeper and add a day or two to the stain life.
Before you book or apply it
Decide whether the fingers are the main event or a supporting detail.
- Repeat one motif across multiple fingers.
- Leave room around joints.
- Use fingertip fill only when the design needs density.
- Let paste dry before using your hands.
If you’re booking a professional henna artist, check their paste. Fresh natural henna paste should smell earthy, almost like a strong tea. If it smells chemical or synthetic, walk out. Black henna contains PPD, a contact allergen that can leave permanent scars, and it shows up at a lot of quick festival booths. Ask directly what’s in the mix and verify the color will be brown, not jet black within minutes.
Timing matters for events. A fresh application needs 6 to 8 hours of paste-on time for the stain to develop fully. The color keeps deepening for another 24 to 48 hours after removal. Book your appointment at least two days before the event you want to show it off for. Avoid soap, chlorine, and heavy sweating during those first 48 hours or you’ll strip the stain before it peaks.
Mistakes to avoid
Avoid using a different style on every finger unless you are deliberately creating a patchwork look.
Do not make finger detail so dense that the hand loses shape.
Safety source note: This guide keeps safety advice conservative and points readers to primary public-health or dermatology sources.
The biggest mistake is going too fine on the finger creases. Lines thinner than a millimeter in those zones look crispy on day one and blow out into a soft smudge by day three because the skin flexes constantly. Any experienced henna artist knows to keep crease-crossing lines slightly heavier so they hold shape through the movement. If you’re doing this yourself, less detail in flex zones means a cleaner result overall.
Don’t peel the dried paste off with water. Let it crack and flake naturally, or scrape it off gently with a butter knife edge. Water during removal weakens the final stain depth noticeably. Also, skipping the aftercare sealing step with a natural oil is a waste. Coconut or mustard oil rubbed over fresh removal locks in color and adds two to three days of wear on high-use finger skin.