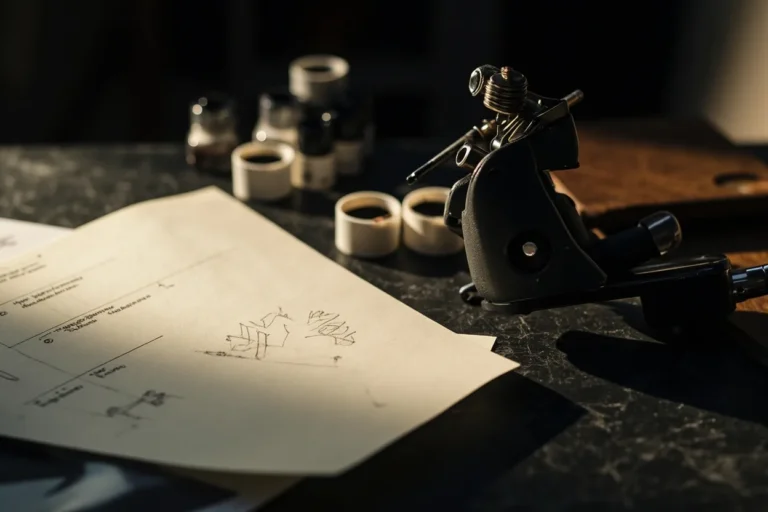
No, you can’t make a real tattoo gun from a toothbrush motor and a guitar string. I’ve had that conversation maybe fifty times in my chair. What you can do is understand how a professional tattoo machine works, learn what separates a functional tool from a dangerous toy, and decide whether building one is worth your time or if you’re better off buying a quality machine and putting your energy into learning to actually use it. This guide breaks down the mechanics honestly, the way I’d explain it to a curious client or an apprentice who’s serious about the craft.
What a Tattoo Machine Actually Does
People call them “tattoo guns” but nobody in a real shop uses that word. We say “machine.” It’s not a gun. It doesn’t shoot anything. It punches needles into skin at a controlled depth, somewhere around 1.5 to 2 millimeters, and pulls them back out hundreds of times per second. The needle carries ink down with it, and the skin’s elasticity holds some of that ink in the dermis layer.
The Two Main Types
There are coil machines and rotary machines. Coil machines use electromagnetic coils to move a spring-loaded armature bar up and down. You hear that classic buzz in shops? That’s a coil machine. Rotary machines use a small motor and an eccentric cam to create the same linear needle motion, but they’re quieter and smoother. I’ve tattooed with both. Coils hit harder, which some artists prefer for bold lines and heavy blackwork. Rotaries are gentler on skin and easier to tune, which is why a lot of newer artists start there.
- Coil machines: electromagnetic, louder, more adjustable, steeper learning curve
- Rotary machines: motor-driven, quieter, more consistent, less maintenance
- Both need precise needle depth, consistent power, and sterile setup
Why Homemade Machines Usually Fail
I’ve seen the YouTube videos. I’ve had kids show me their “builds” on phones. The problem isn’t creativity. It’s physics and biology. A tattoo machine needs to do several things simultaneously that homemade versions almost never manage.
First, the needle grouping has to move in a perfectly straight line. Any wobble, any side-to-side play, and you’re tearing skin instead of depositing ink cleanly. Second, the speed and stroke length need to stay consistent. Human skin has different resistance on different body parts. The machine has to push through that without stalling or speeding up. Third, and this is the one that matters most, everything that touches the client has to be sterile. Your homemade frame made from a door hinge? You can’t autoclave that. You can’t even clean it properly.
The Real Risks
I’ve fixed blowouts from homemade machines. I’ve seen infections that needed actual medical attention. The skin trauma from an inconsistent needle bar causes more damage than proper ink placement, which means the tattoo heals poorly, falls out, or scars. You’re not saving money if you end up in urgent care.
- Inconsistent needle motion causes blowouts and scarring
- Non-sterile components risk serious infection
- Improper depth control damages skin permanently
- Most homemade builds can’t maintain consistent voltage under load
What You’d Actually Need to Build One
If you’re determined to understand the mechanics, here’s what a functional coil machine requires. I’m not giving you a step-by-step for a working tattoo tool because I won’t be responsible for what you do with it. But understanding the parts helps you appreciate why a $200 machine costs what it does.
The frame needs to be non-magnetic, rigid, and balanced. Most quality frames are iron or steel, precisely machined. The coils are copper wire wrapped around iron cores, usually 8 to 10 wraps for liners, fewer for shaders. The armature bar is spring steel, and the front and rear springs are tuned to specific tensions. The contact screw and front binding post complete the circuit. The tube and grip hold the needle bar, which has to be the right diameter for the needle grouping. The rubber bands, called “rubbers” or “bands,” add downward pressure on the needle bar.
Every one of those parts has a tolerance. The gap between the armature bar and the front coil core? That’s your “air gap,” and it affects speed and hit. The spring tension changes how hard the needle strikes. The capacitor across the coils smooths the electrical pulse. Getting all of this right by hand, without a machine shop and an oscilloscope, is nearly impossible.
The Power Supply Problem
People forget about this part. A tattoo machine needs clean DC power, usually 4 to 12 volts depending on the machine and the work. Wall adapters fluctuate. Batteries drain unevenly. Professional power supplies have clip cords, foot switches, and voltage regulators. I’ve watched homemade setups spike and drop voltage mid-stroke, which means the needle is literally stabbing instead of cycling smoothly.
What I Tell People Who Want to Build One
Usually they’re two types. The tinkerer who loves mechanical projects, and the person who thinks building a machine is cheaper than buying one. To the first group, I say: build one if you want to understand the physics. Don’t tattoo anyone with it. To the second group, I say: a decent starter rotary costs about what you’d spend on raw materials and tools to build something half as good.
Apprenticeship is how this craft actually transfers. You learn machine maintenance, tuning, and setup under someone who’s been doing it for years. You don’t learn that from a forum post. In my shop, new apprentices spend weeks just breaking down, cleaning, and reassembling machines before they ever touch practice skin. The machine is an extension of your hand. You can’t shortcut that relationship.
Where to Put Your Energy Instead
- Buy a quality starter machine and learn to tune it properly
- Practice drawing and design fundamentals
- Seek apprenticeship at a reputable shop
- Learn about skin types, healing, and how ink sits in different tissue
- Understand bloodborne pathogen protocols and sterile procedure
Aftercare and Healing Reality
Even with a perfect machine, aftercare determines how a tattoo looks in five years. I tell every client: keep it clean, keep it slightly moist but not wet, don’t pick, don’t soak it. The healing timeline is about two weeks for surface healing, six to eight weeks for the dermis to fully settle. Sunscreen matters more than most people think. UV breaks down tattoo pigment over time. A black line that stays crisp is usually a line that was applied at correct depth with proper technique and then protected from sun damage.
Pain varies by placement. Ribs, feet, hands, and anywhere near bone hurts more. Fleshier areas like outer arm or thigh are easier sits. Cost in most US shops runs $150 to $200 per hour for experienced artists, with minimums around $100 even for small pieces. Good work isn’t cheap. Cheap work isn’t good. I’ve covered enough bad tattoos to know that lesson is expensive.
Key Takeaways
Building a tattoo machine from scratch is technically possible but practically foolish for anyone who wants to tattoo safely. The precision required exceeds what most hobbyists can achieve, and the risks of infection, scarring, and ruined artwork are real. Your time and money are better invested in quality equipment, proper training, and apprenticeship. The machine is only a tool. What matters is the hand that guides it and the knowledge behind it. I’ve been tattooing for years, and I still learn something new about my machines every month. That’s the craft. Respect it enough to start with the right foundation.
Frequently Asked Questions
Can I practice tattooing on myself with a homemade machine?
I strongly advise against it. Self-tattooing with unregulated equipment risks serious infection, permanent scarring, and blowouts that require costly laser removal. Even professional artists rarely tattoo themselves because of the awkward positioning and inability to stretch skin properly.
What’s the cheapest safe way to start learning tattooing?
Buy a quality starter rotary machine from an established brand, practice on synthetic skin or fruit, and seek apprenticeship at a licensed shop. Expect to spend $200-400 on initial equipment before you ever touch a person.
Why do tattoo artists get annoyed when people say ‘tattoo gun’?
The term implies something that shoots or injects ink, which isn’t how tattooing works. ‘Machine’ or ‘iron’ reflects the precision tool it actually is. It’s a small thing, but language matters in a craft that takes years to master.
How do I know if a tattoo machine is quality or junk?
Look for machined steel or aluminum frames, brand-name motors or coils, consistent needle motion when running, and reviews from working artists. Avoid anything sold as a ‘complete kit’ with dozens of random inks and disposable-looking parts. Real machines are sold by tattoo supply companies, not general electronics retailers.