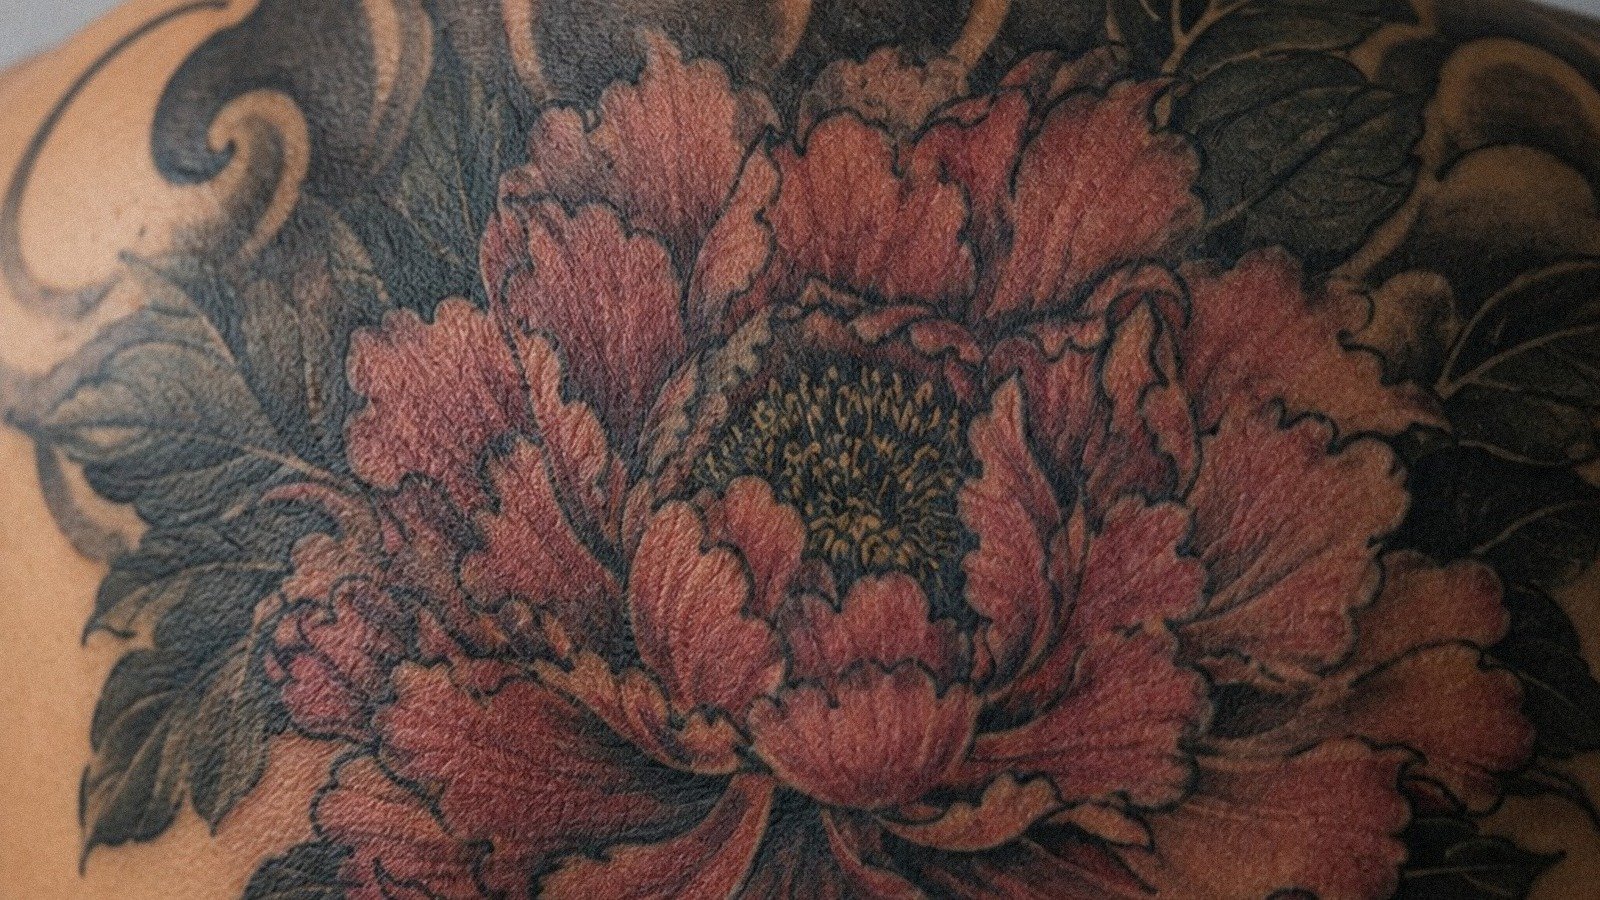
Latest simple mehndi designs on skin usually land best when you keep the linework clean, the layout breathable, and the session realistic at about $150 to $450 for a small fine line piece. I wanted that soft mehndi flow without ending up with soup on my hand later. So I treated it like a tattoo decision, not a Pinterest dare.
Here’s what it looked like before
Before I changed anything, my hand and wrist had that blank, almost unfinished look you get when you know you want ornament but you don’t know how much skin to leave alone. I brought in screenshots, saved a few modern mehndi references, and immediately saw the problem: too many of them were pretty in a flat image and wrong for real skin.
Tiny lacey details. No breathing room.
A lot of copy-paste symmetry that would have looked stiff on me.
I see this a lot when you want a mehndi-inspired tattoo. You think you need more detail to make it feel special, but you usually need less.
Your hand moves all day. Your knuckles crease.
Your wrist twists. If the design does not flow with that movement, it will not read clean from across the room, and it definitely won’t heal nice.
If you need a quick reset before saving more references, modern mehndi designs that translate into skin is a strong starting bank.
- Dynamic Black cleaned up the front hand
- Sketched tiny florals around my wrist
- Kept the palm center mostly bare
- Added slim vines across my fingers
- Pick-and-Stick saved the bracelet cuff
- Placed a small mandala near my thumb
- Mixed dots with fine leafy trails
- Matched both hands with uneven details
- Tried negative space around the knuckles
- Anchored the palm with one paisley
- Extended the design toward my forearm
- Kept the fingertips dark and simple
- Checked how the lines photographed outside
- Saved the easiest design for touch ups
1Dynamic Black cleaned up the front hand
One small detail at the wrist bone, and the whole design stopped being simple.
 Dynamic Black cleaned up the front hand” style=”width:100%;border-radius:14px;display:block;margin:14px 0 6px;box-shadow:0 3px 18px rgba(0,0,0.08);”>
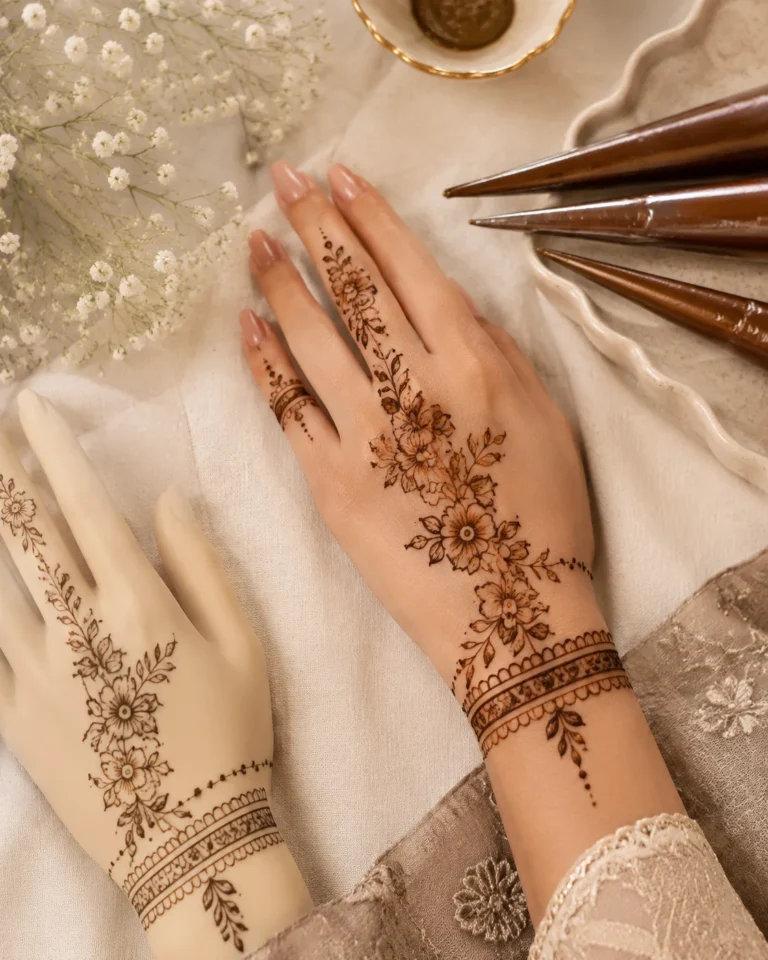
I started with the front hand because that’s where a simple mehndi tattoo either feels graceful or gets loud fast. The layout in my reference sat wide enough to frame the hand, but it didn’t crowd the tendons or stack fussy shapes over every joint. On fair cool-pink skin, that kind of negative space matters even more because every line looks crisp right away.
If you want this placement, keep your center path obvious. I like a fine line build with Dynamic Black and a 3RL for the main framework, then I let the side motifs stay lighter.
You need the design to guide the eye from wrist to middle finger without forcing it. For more front-hand reference, I keep sending people to 18 simple mehndi designs front hand you can copy fast because the cleaner ones there read much better than the overloaded stuff you see on social.
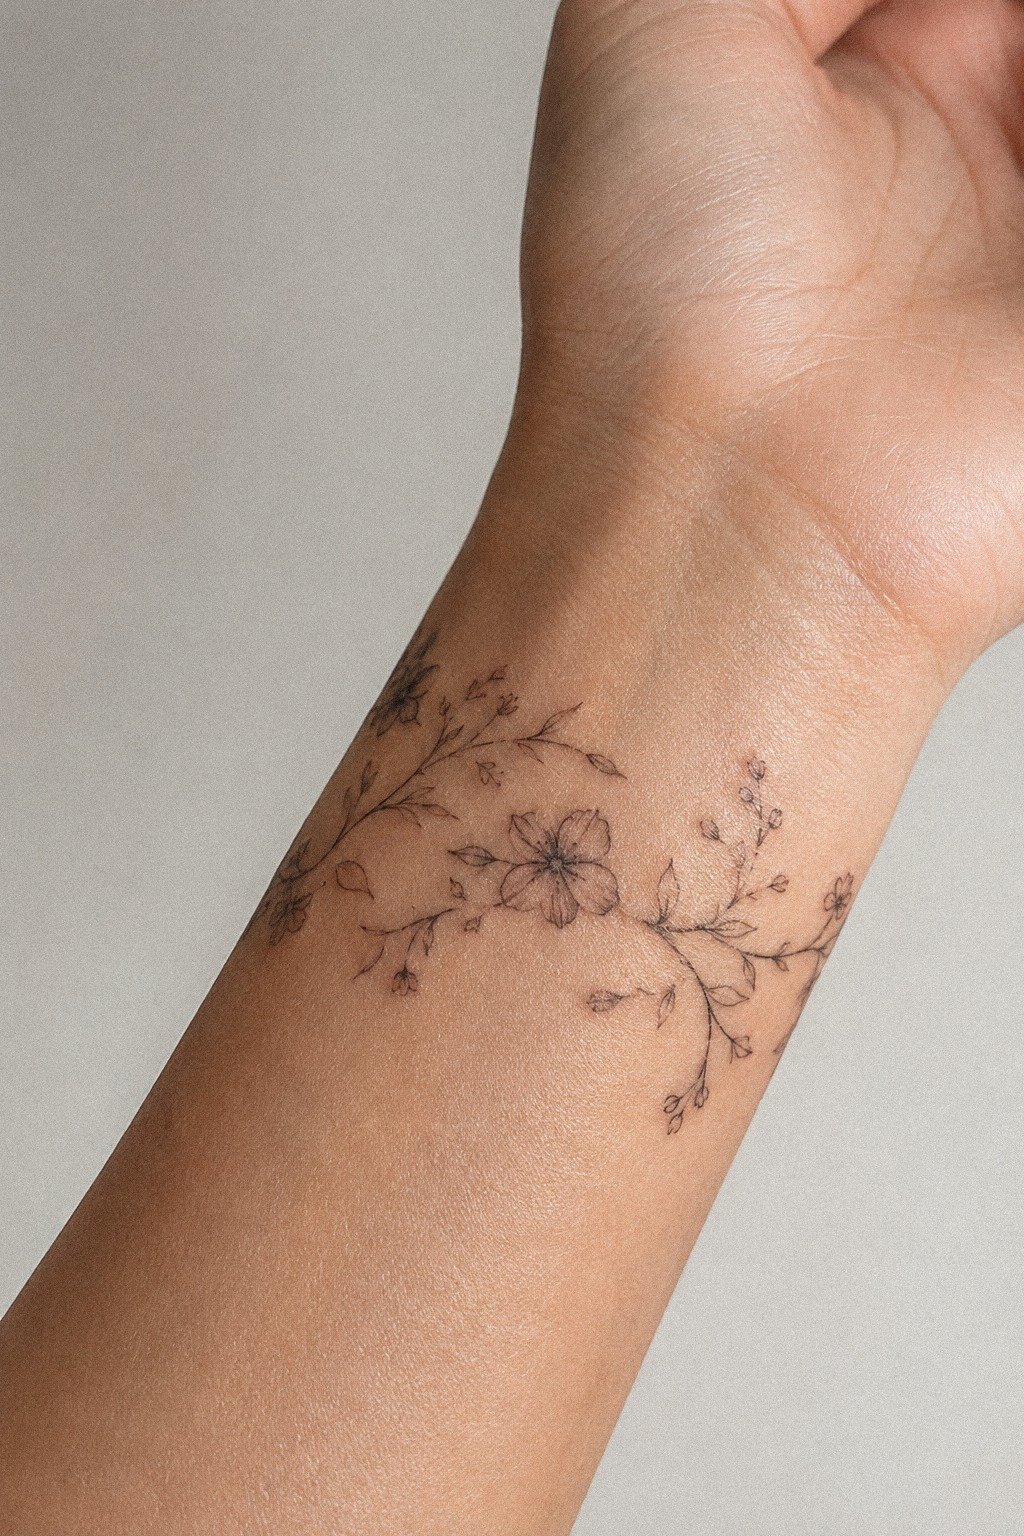
2Sketched tiny florals around my wrist
 tiny florals around my wrist” style=”width:100%;border-radius:14px;display:block;margin:14px 0 6px;box-shadow:0 3px 18px rgba(0,0,0.08);”>
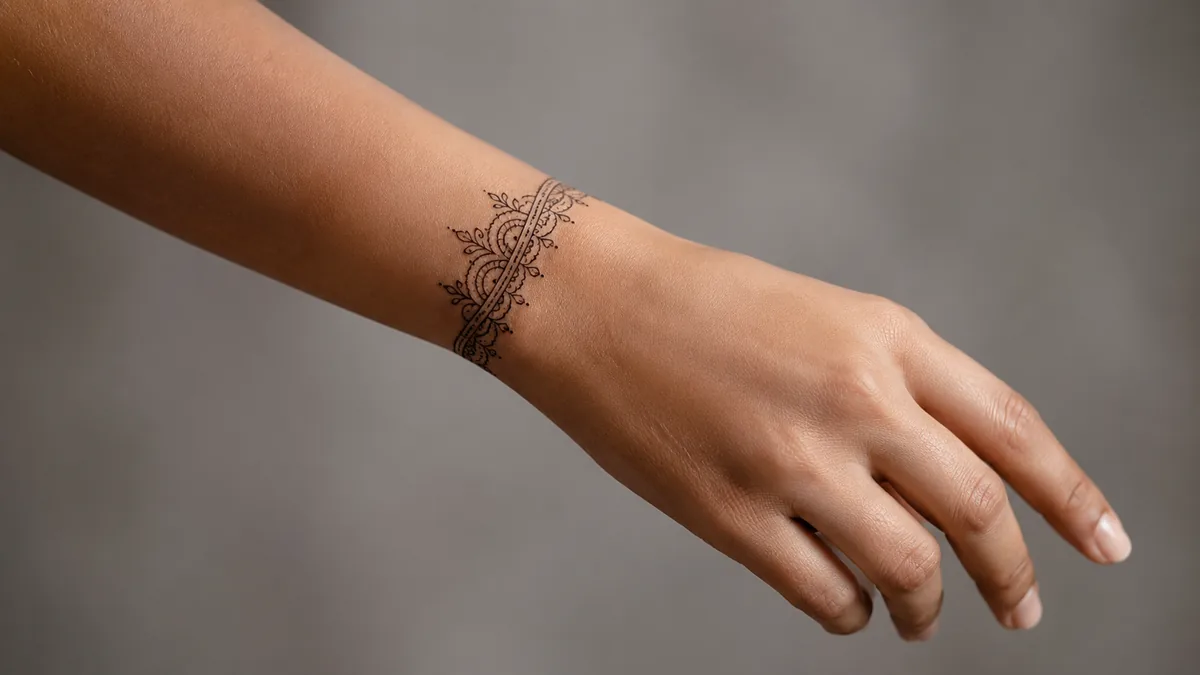
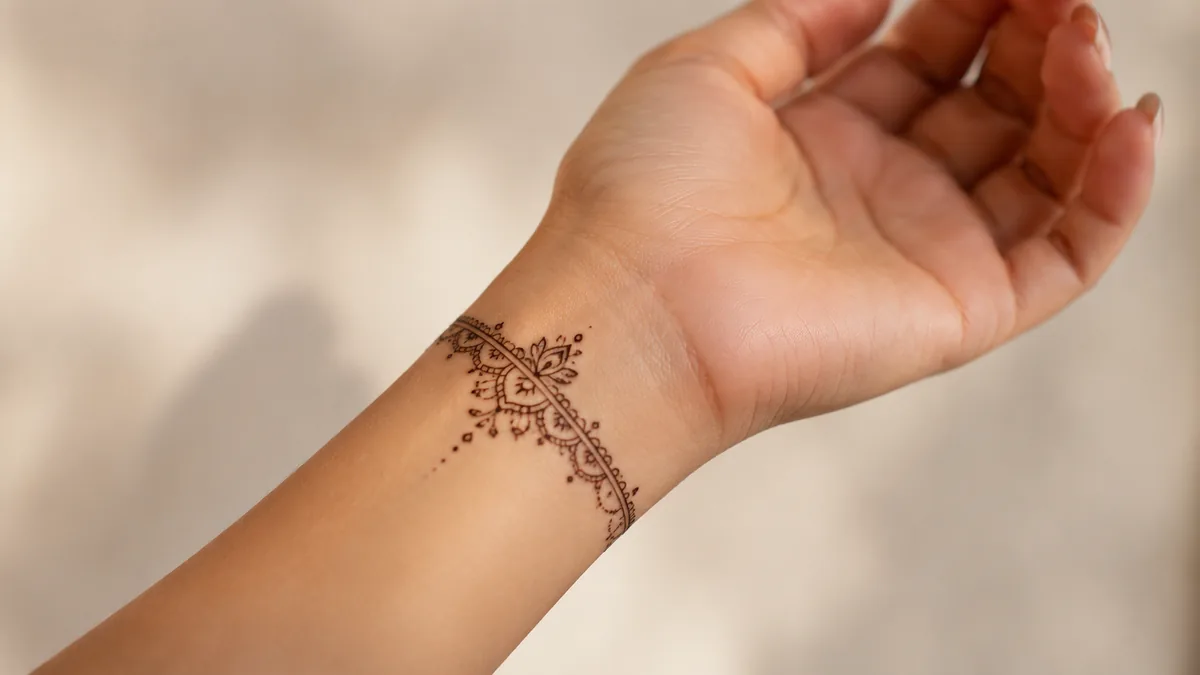
The wrist detail was the whole turning point. I thought the hand would be the star, but the tiny florals around my wrist made the design feel finished instead of pasted on. That slim ring of petals gave the layout a start point, almost like a soft cuff, and it kept the rest of the tattoo from floating.
You have to be picky here. Tiny florals can get chewed up if the petals are packed too tight or if your artist scratches at them instead of making one clean pull.
I kept each bloom open, with enough skin showing between leaves, and that made the linework look airy on medium warm ivory skin. If you are collecting references, 22 very simple mehndi designs that look effortlessly intentional is a better vibe check than chasing exact copies. And honestly, this is where I tell clients to stop trying to miniaturize a full bridal pattern onto a wrist.
3Kept the palm center mostly bare
 palm center mostly bare” style=”width:100%;border-radius:14px;display:block;margin:14px 0 6px;box-shadow:0 3px 18px rgba(0,0,0.08);”>
This was my first hard no. I did not want the whole palm loaded up, because the center of your hand takes friction, sweat, and constant movement. Palm-heavy detail can look bold for a minute, but on a mehndi-inspired tattoo it often ages rough unless you’re fully committed to touch-ups.
Leaving the center mostly bare did two things for me. First, it made the surrounding pattern look cleaner on medium olive skin because the eye had somewhere to rest.
Second, it protected the design from turning muddy where the skin texture is busiest. First few days it’s an open wound, treat it like that, and palms are extra annoying.
You wash your hands, grab your phone, hold a steering wheel, live your life. Why overbuild the exact spot that gets the most abuse? If you still love dense coverage, full hand mehndi designs to show your artist first is useful, but I would still edit it down for permanent ink.
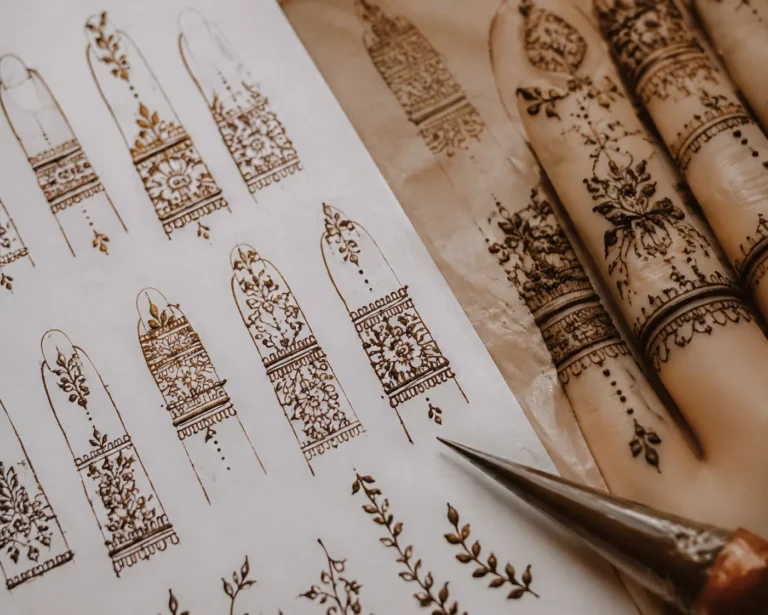
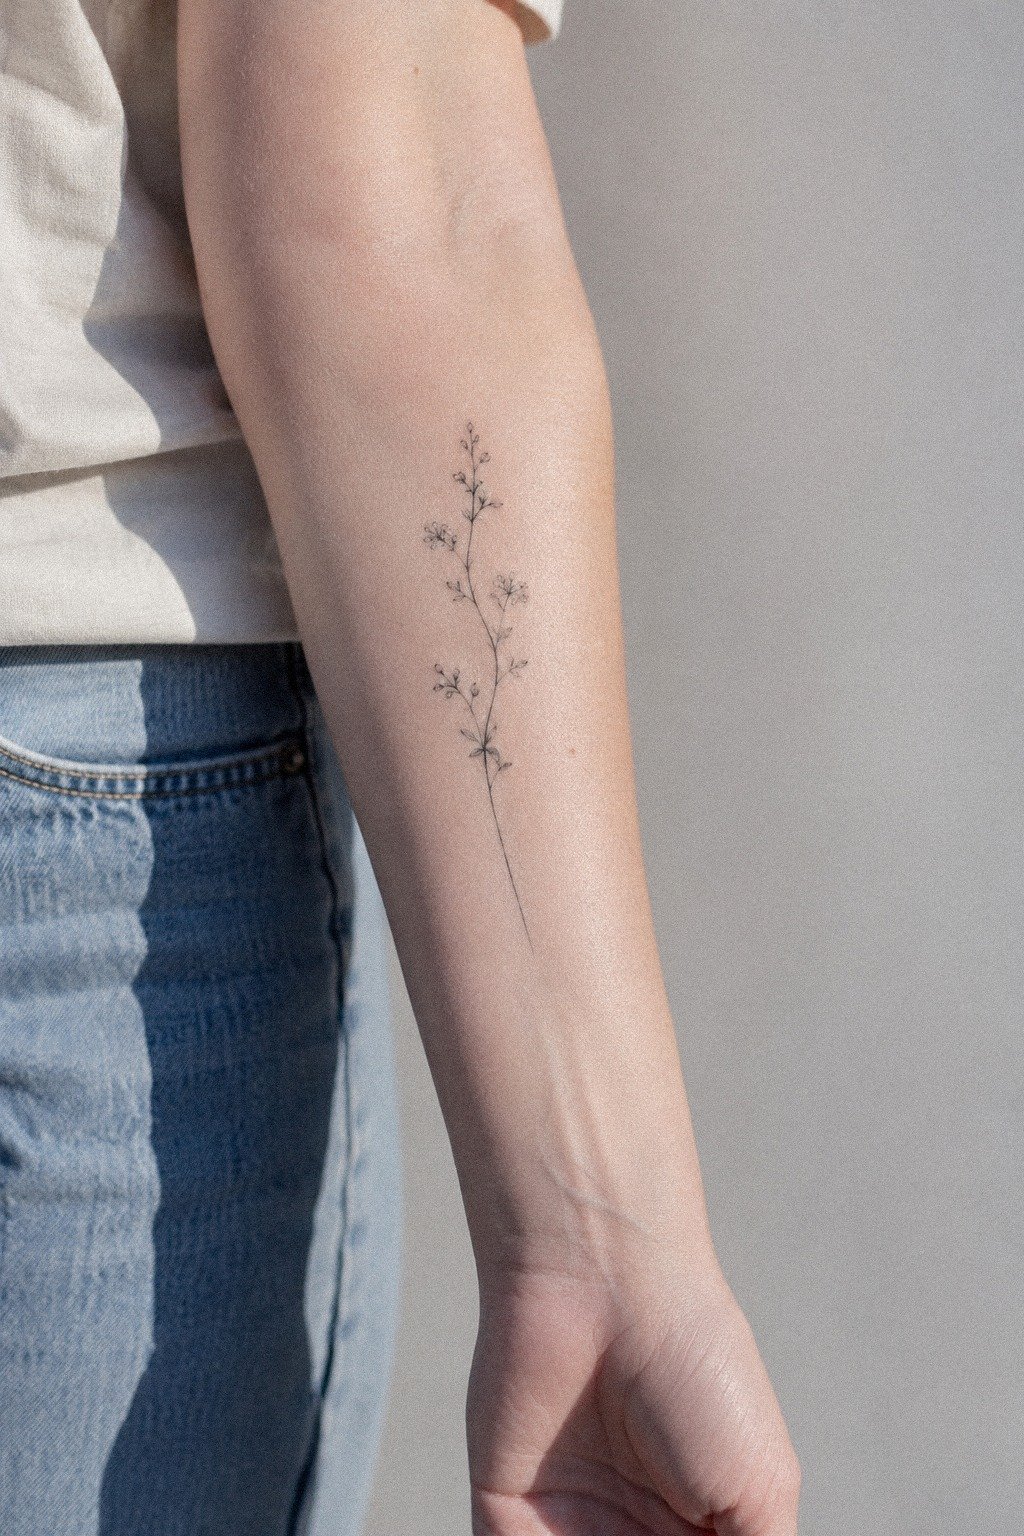
4Added slim vines across my fingers
 slim vines across my fingers” style=”width:100%;border-radius:14px;display:block;margin:14px 0 6px;box-shadow:0 3px 18px rgba(0,0,0.08);”>
Finger details are spicy in two ways: the pain is sharper, and the healing is less forgiving. I still liked slim vines crossing the fingers because they gave the whole mehndi tattoo that stretched, elegant flow you want, but I kept them thin and deliberate instead of wrapping every inch.
That matters on golden tan skin where line contrast can look gorgeous but also expose shaky execution. One clean pull, not ten fuzzy ones.
I had the vines track with the natural angle of each finger so they looked placed, not stamped. And I skipped the urge to jam dots into every gap.
If you want more ideas that stay readable, simple henna designs for beginners is useful because beginner-friendly layouts often age better than “advanced” ones that are just overcrowded.
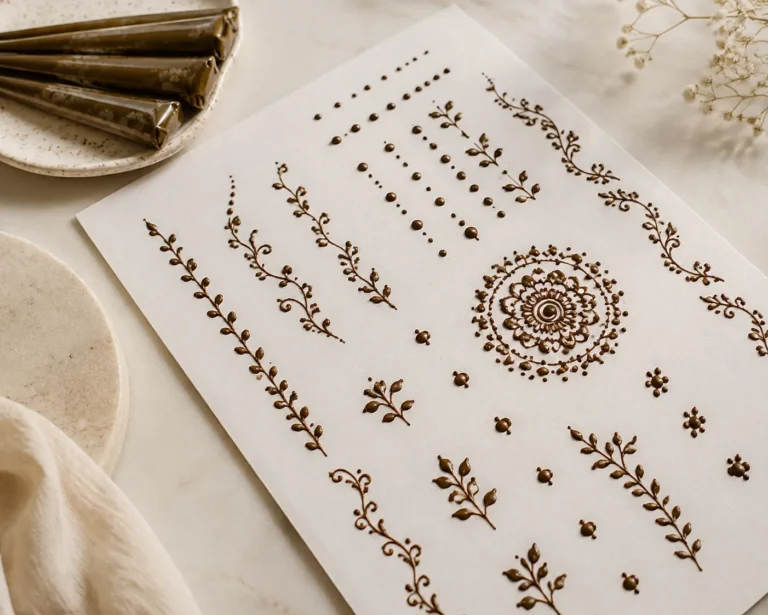
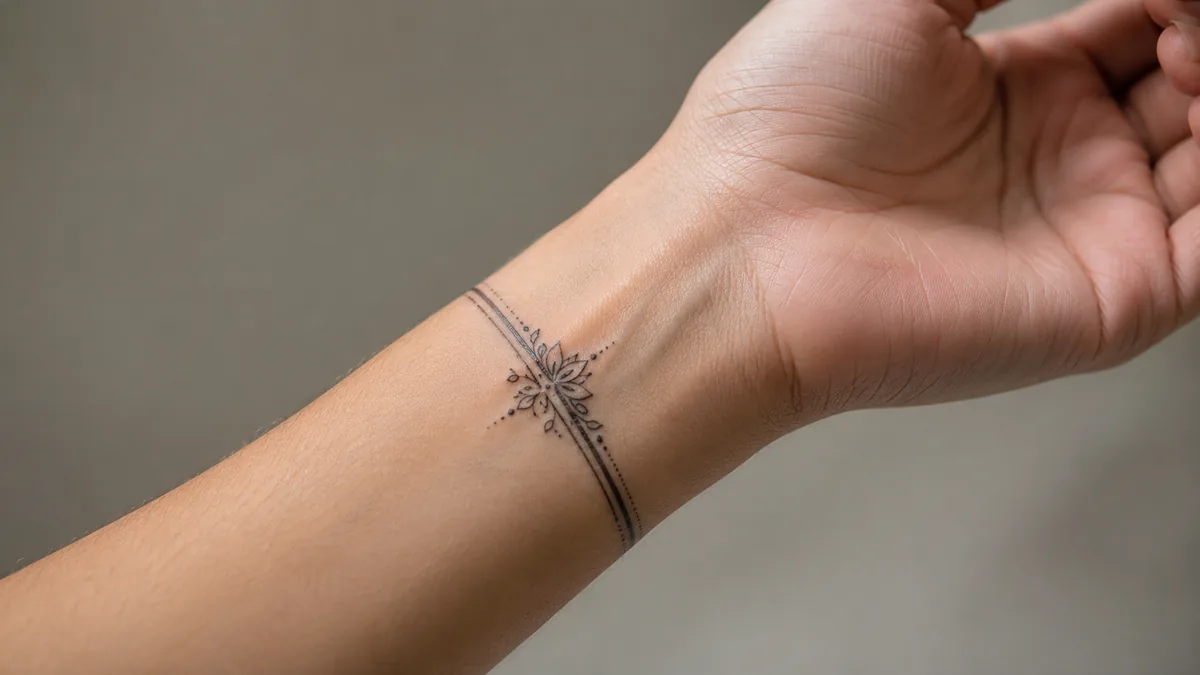
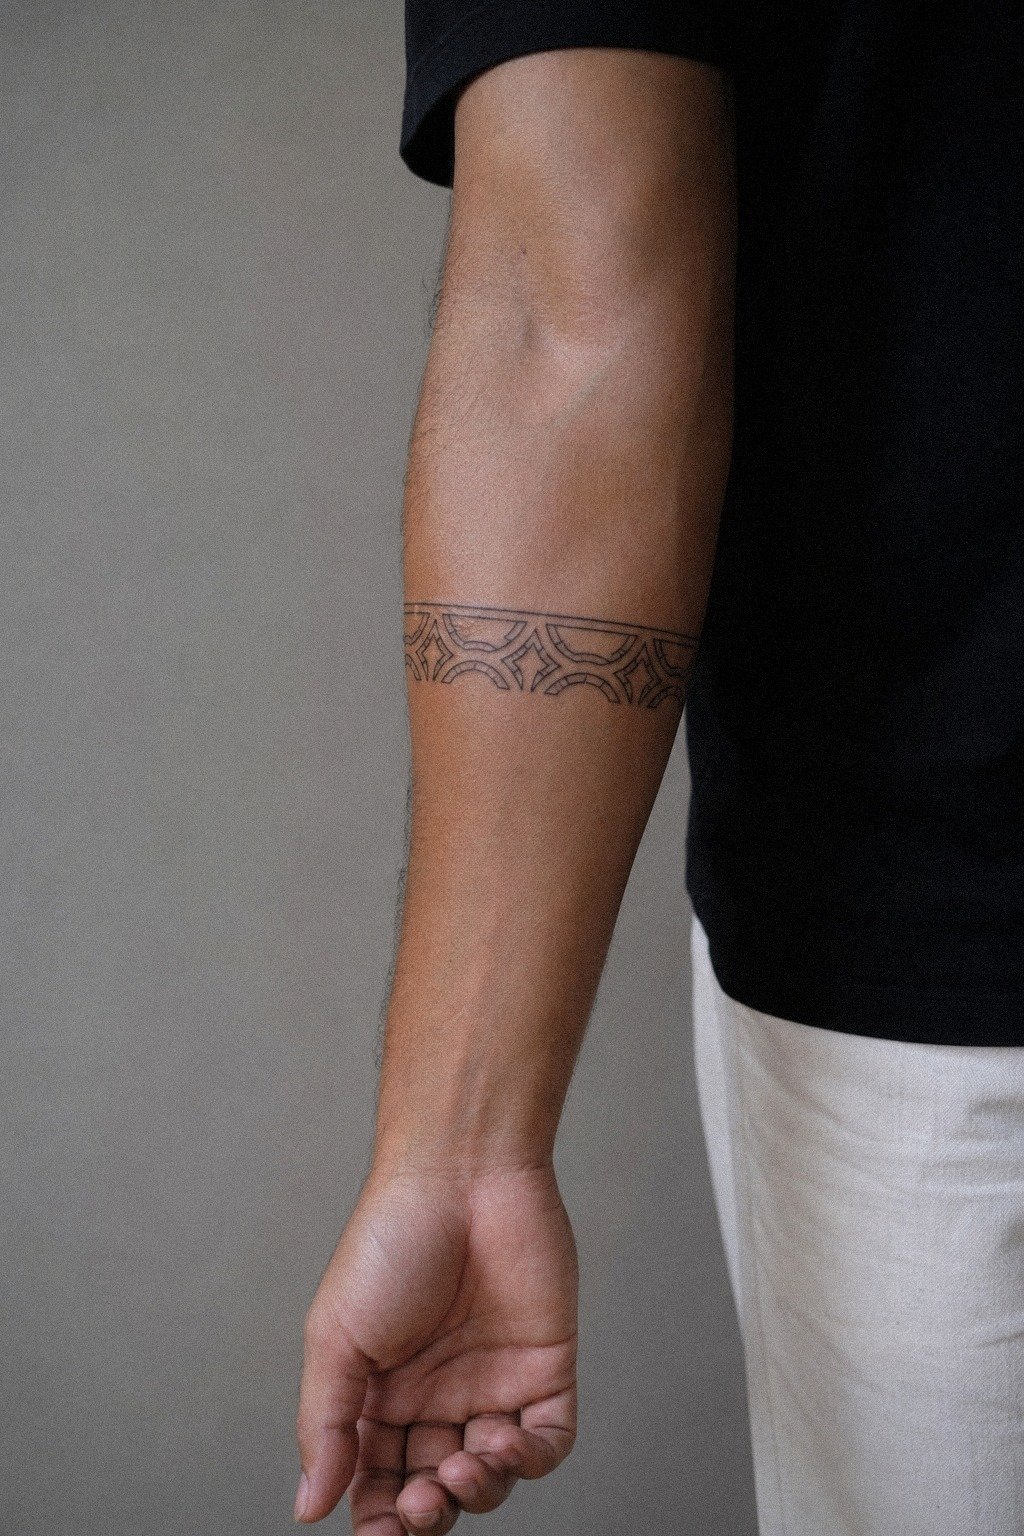
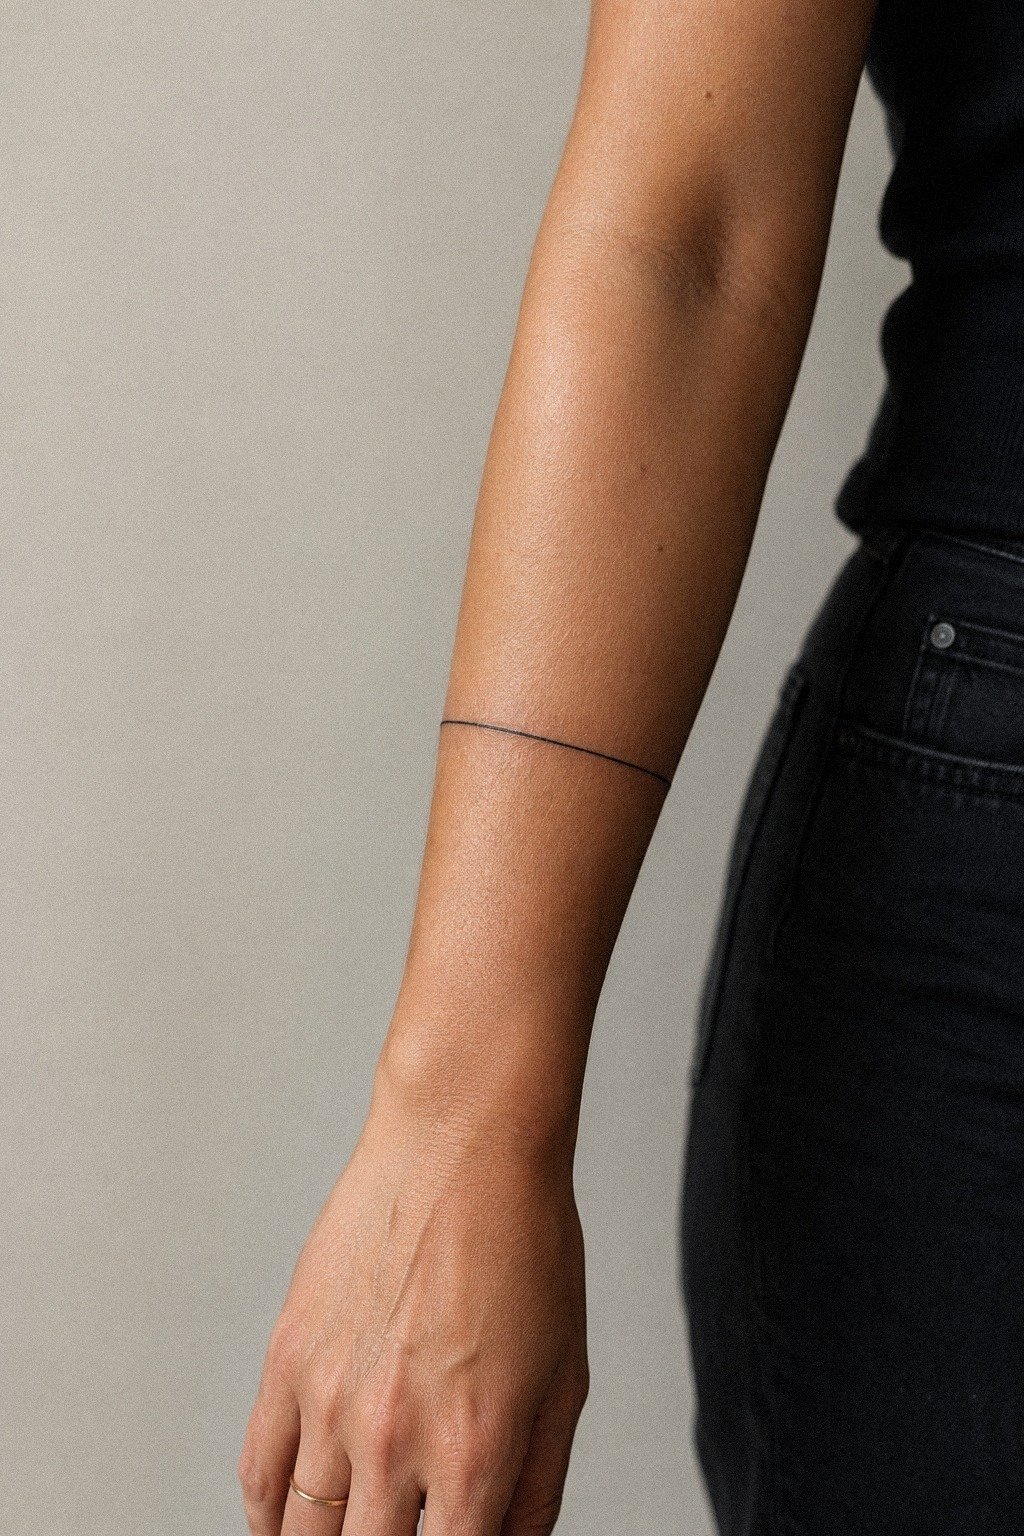
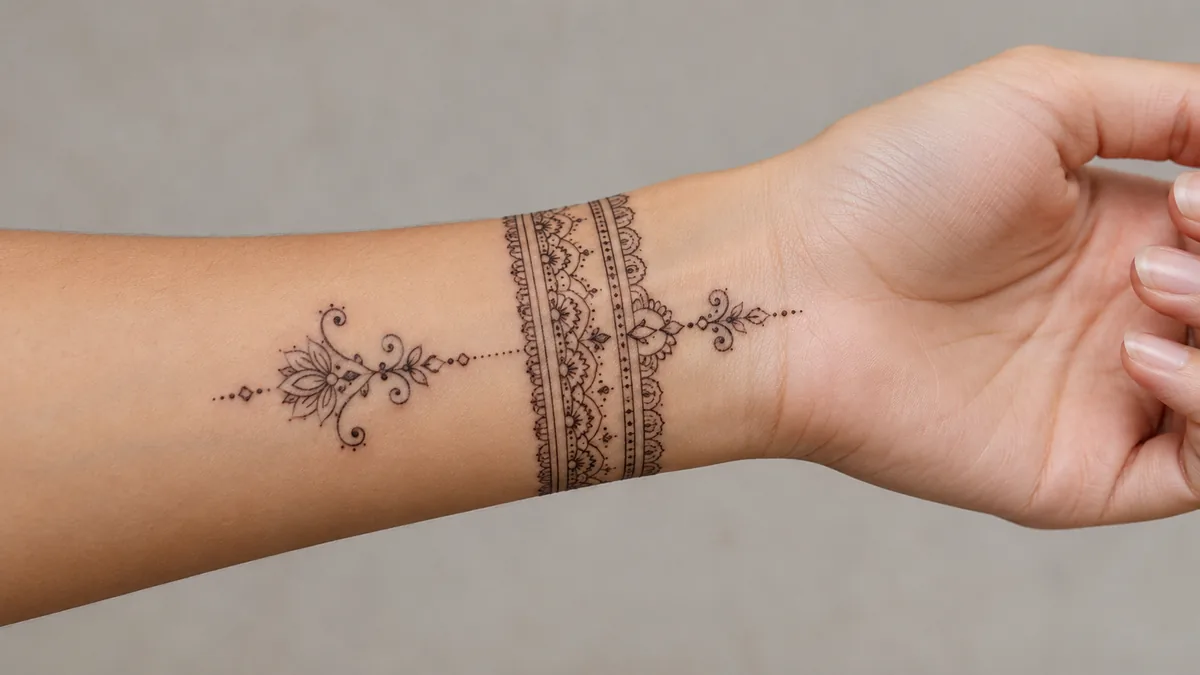
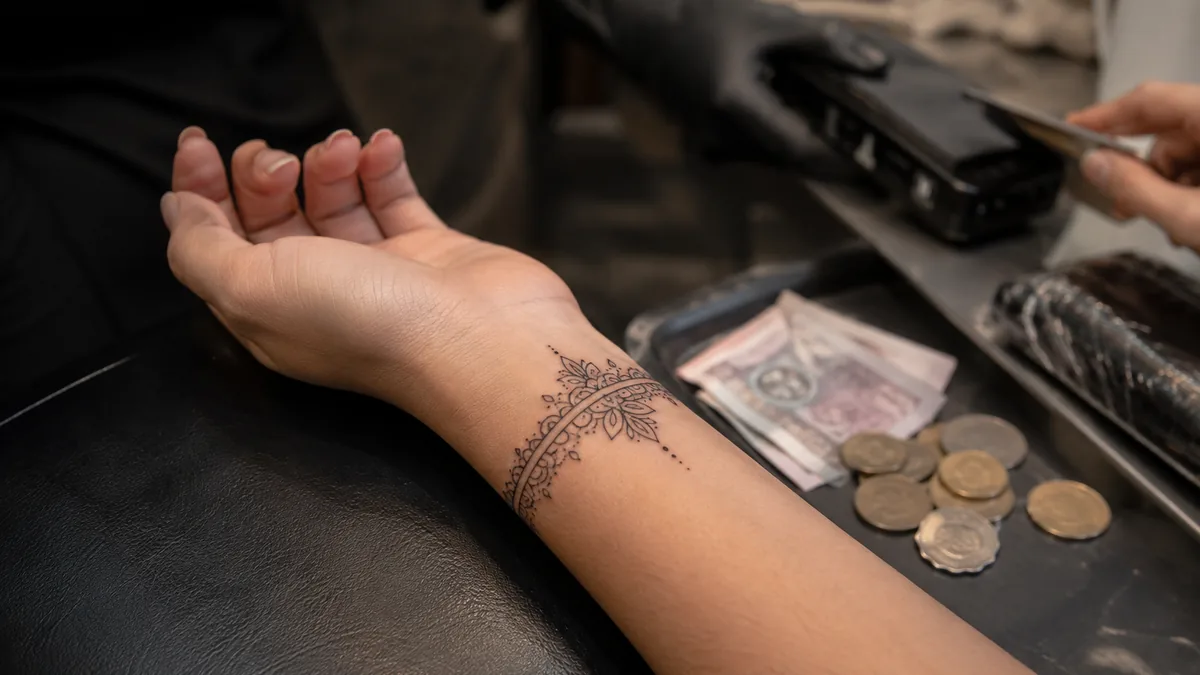
5Pick-and-Stick saved the bracelet cuff

Before anything hit skin, I wanted to see the bracelet idea in flash form.
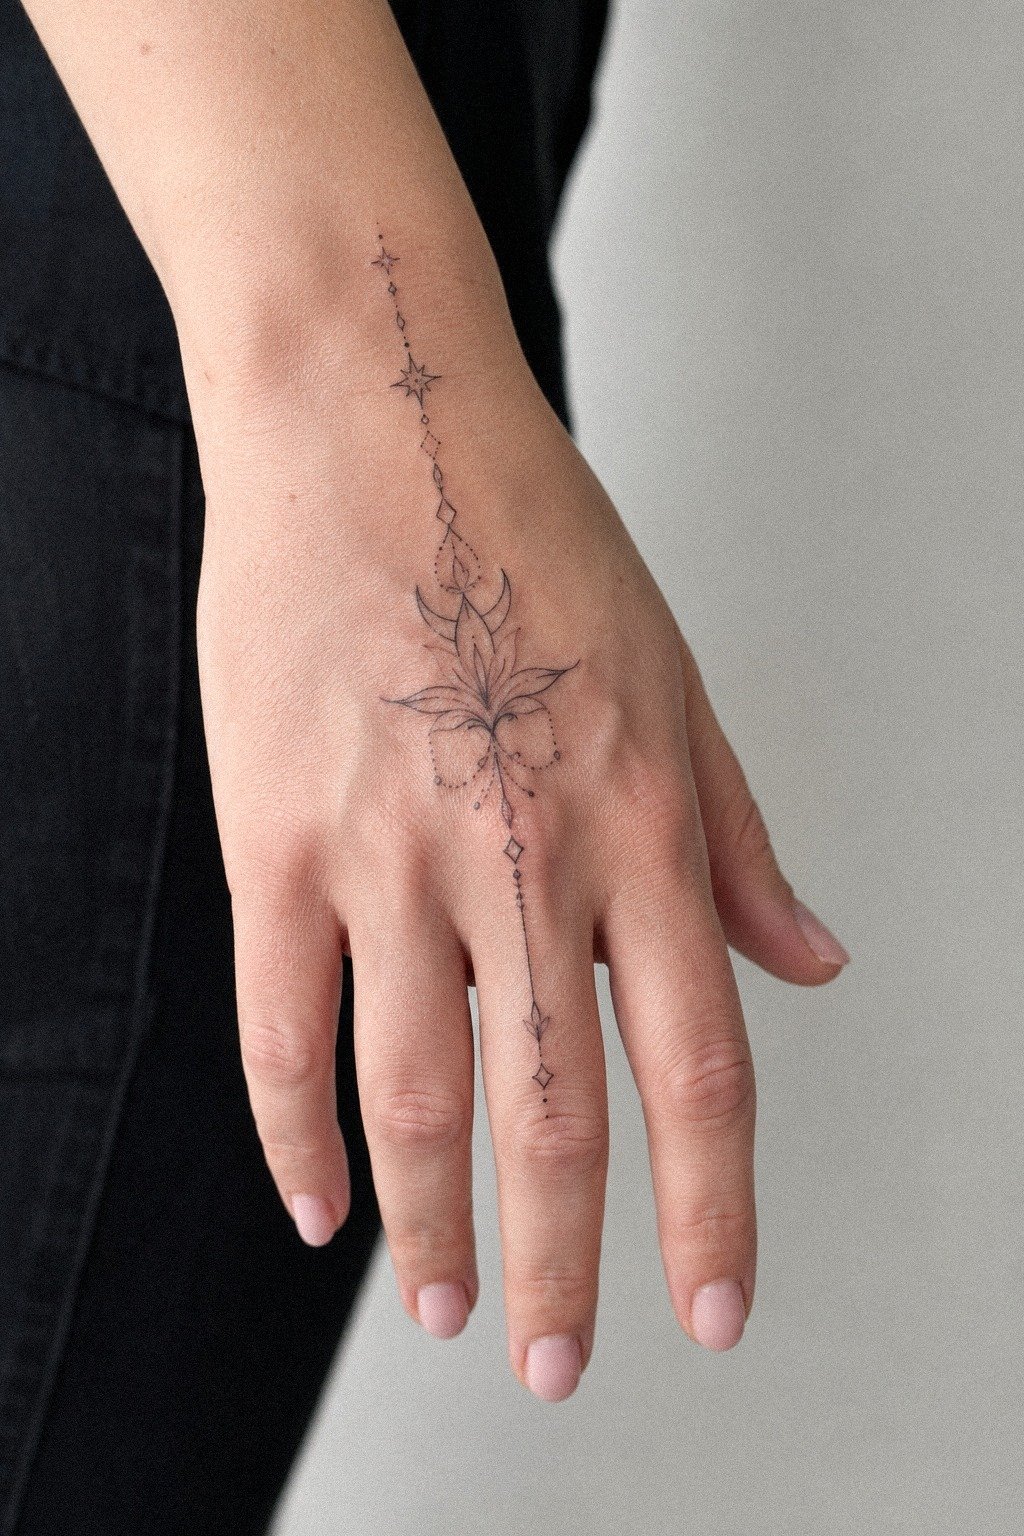
6Placed a small mandala near my thumb
 small mandala near my thumb” style=”width:100%;border-radius:14px;display:block;margin:14px 0 6px;box-shadow:0 3px 18px rgba(0,0,0.08);”>
A thumb-side accent sounds minor, but it changes the whole balance of a hand tattoo. I used a small mandala near the thumb web so the design had a visual anchor on the outside edge. Without that, the center motif can feel like it’s sliding inward.
Keep the scale tight. Too big near the thumb and it competes with everything else. Too tiny and it disappears once the skin settles.
I like geometric petals with enough black to hold, especially on deeper skin where contrast is your best friend. That’s one reason I still point people to mandala mehndi designs before they book. A clean mandala reads strong from a distance, and if you want longevity, bold geometry will hold longer than whisper-thin filler.
7Mixed dots with fine leafy trails
This section was all about texture. Dots on their own can feel flat. Leafy trails on their own can feel too soft.
Mixing them gave the tattoo a little pulse without making it busy. On fair cool-pink skin, those tiny black accents made the whole forearm flow feel more saturated even though the actual amount of ink stayed light.
It looked so clean outside!
I used what I call the Soft Contrast Rule here. Keep the leaves light and let the dots do the punctuation. That way your design stays feminine without healing flat.
If every mark is equally delicate, nothing leads. If every mark is bold, it stops feeling like mehndi and starts feeling heavy-handed.
The middle wins every time. When clients want softer rhythm, I pull up peacock mehndi designs beside cleaner blackwork references so we can strip the idea down without losing charm.

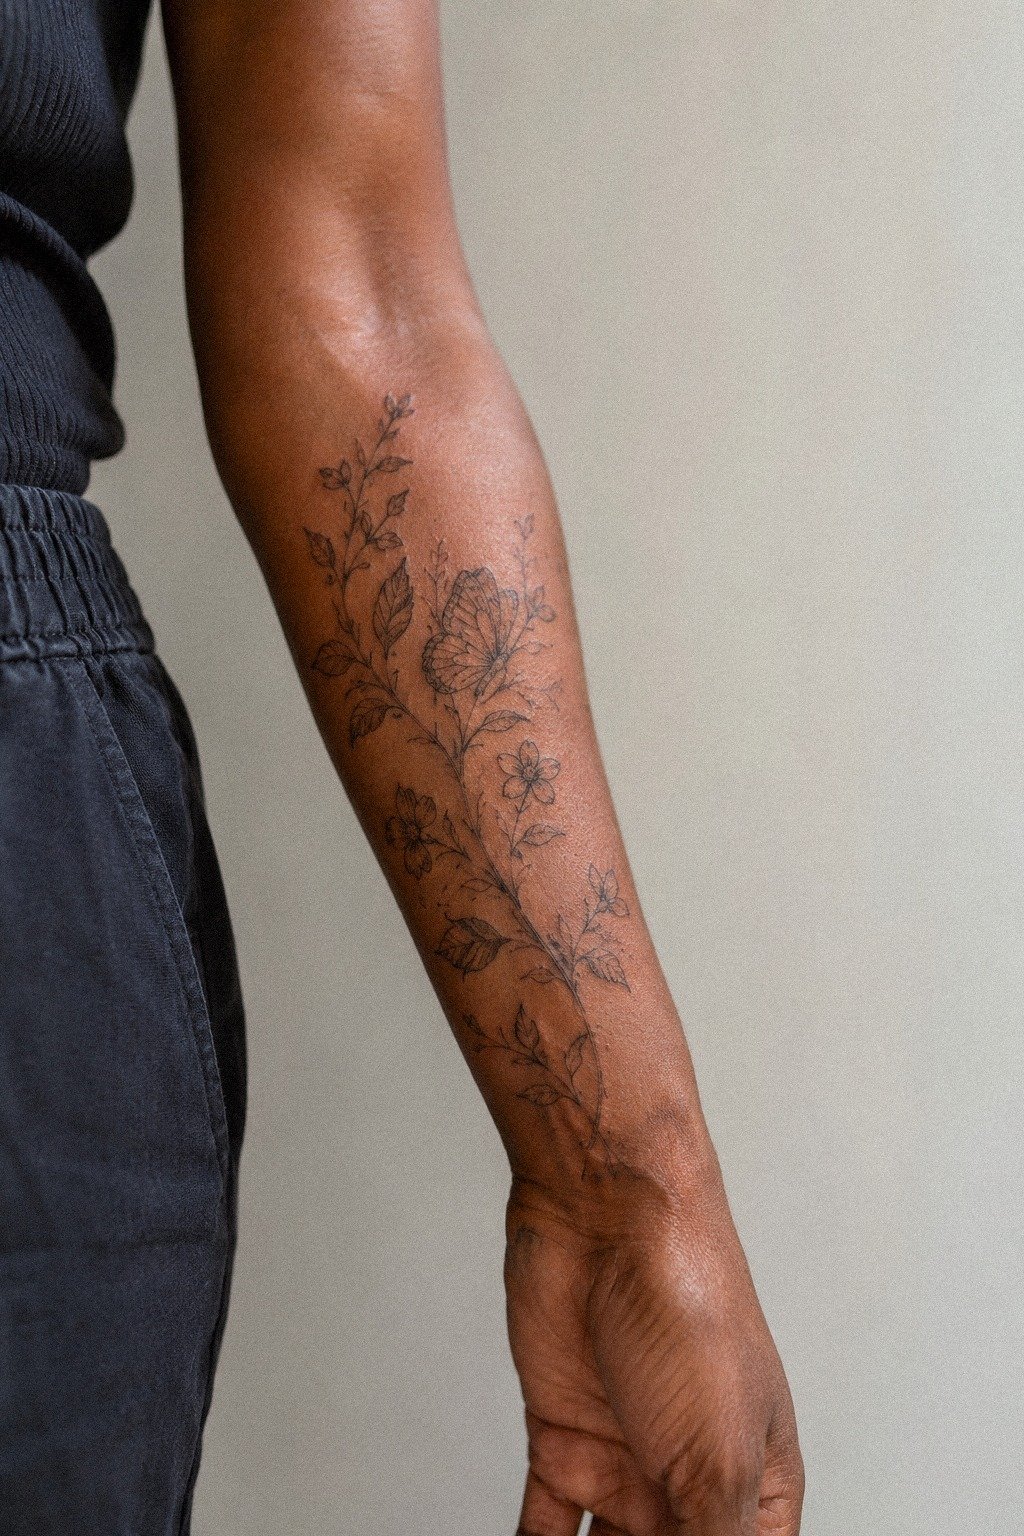
8Matched both hands with uneven details
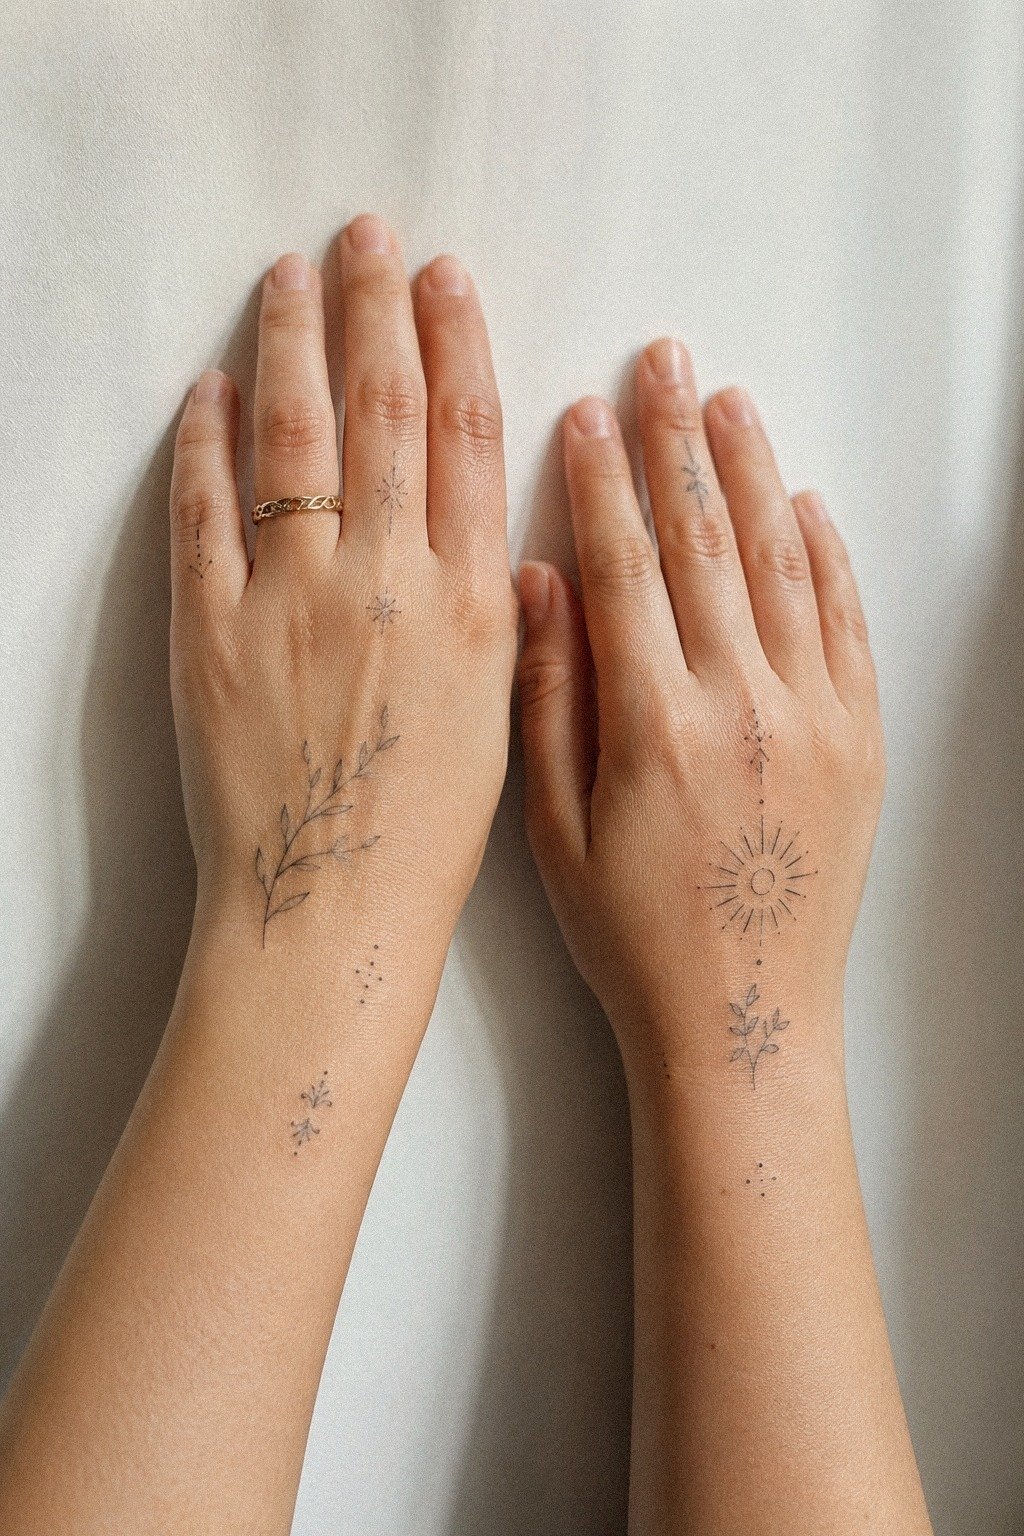
Symmetry sounds safe, but perfect matching can kill the charm of a mehndi-inspired tattoo. I wanted both hands to feel related, not cloned. So I repeated the same language, florals, dots, small curves, but changed the spacing and let one side carry slightly more weight.
That unevenness made the set look lived in and real on medium warm ivory skin. Your hands aren’t mirror copies in daily use anyway.
One hand holds, one gestures, one catches light differently. I tell clients this all the time: if you insist on exact symmetry from fingertip to wrist, you may get precision, but you can lose soul.
For reference sets that play with balance well, 17 latest simple mehndi designs that transcend trends 3 is worth a scroll.
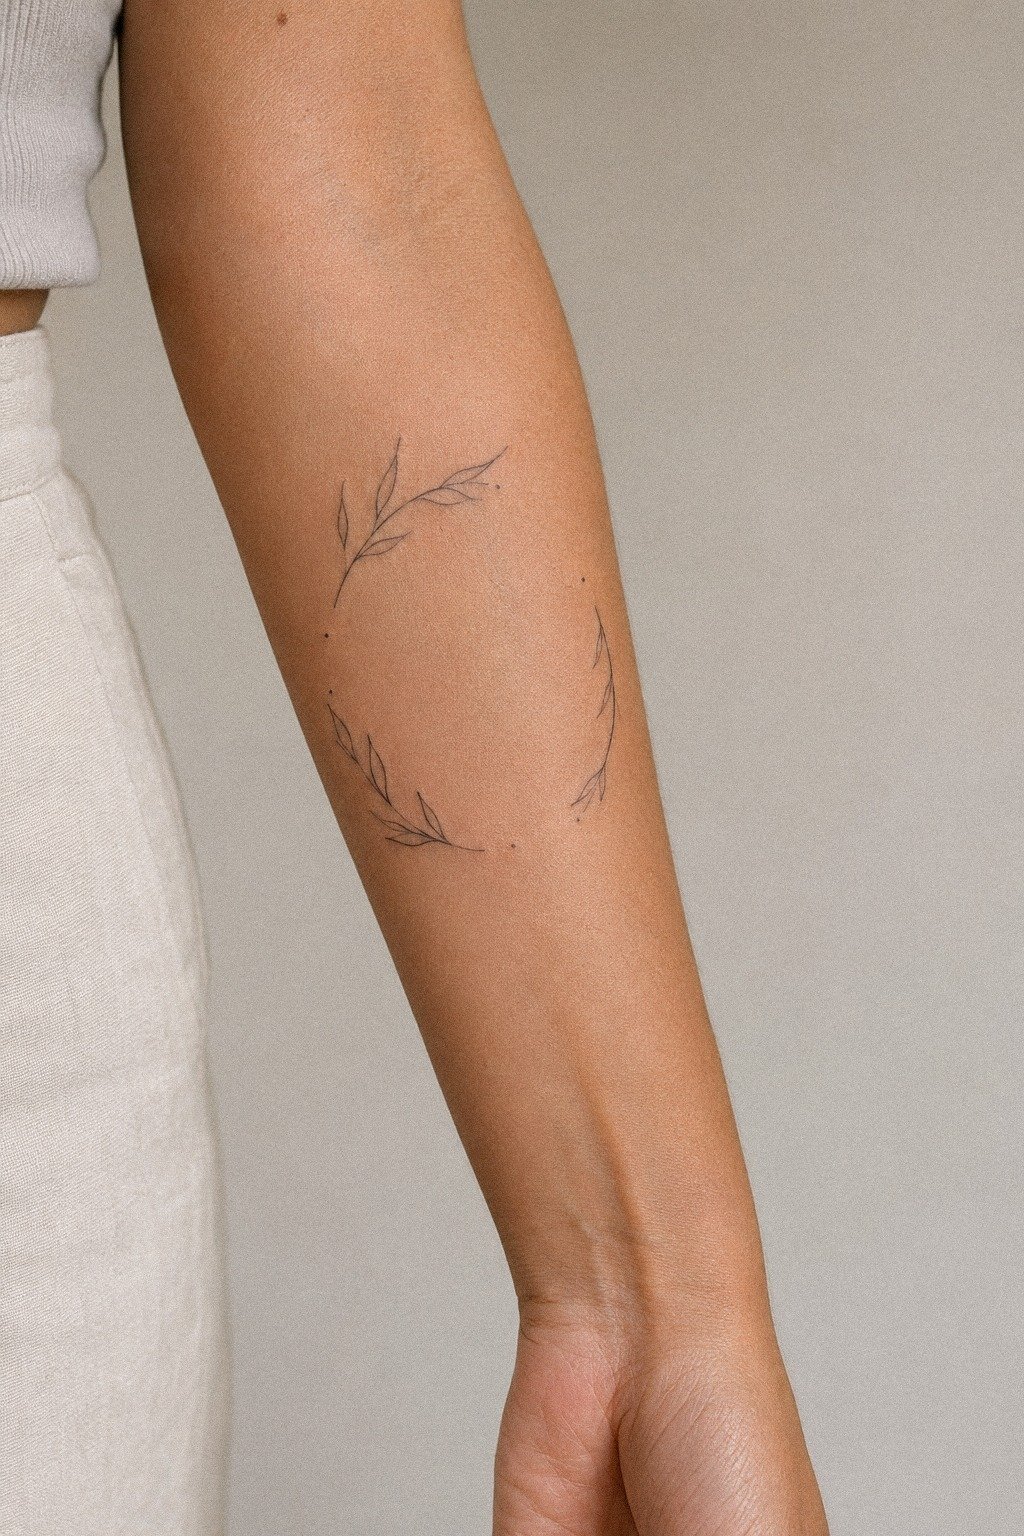
9Tried negative space around the knuckles
Knuckles are where a hand tattoo can start looking cramped. I left deliberate negative space there so the design could breathe when my fingers bent.
That gap wasn’t empty. It was structure.
The pattern wrapped my forearm directionally, but it backed off near the joints, and that made everything feel cleaner.
This is my Breathing Room Rule. If the tattoo flexes, leave it room. Knuckles, wrist folds, inner finger joints, all high-wear zones.
You don’t need to tattoo every millimeter just because the reference image did. And if your artist says, “let’s open this up a little,” listen to them. That is usually the moment they stop you from paying for future soup.
If you need another proof point, tattoo design ideas that age well makes the same case with different motifs.
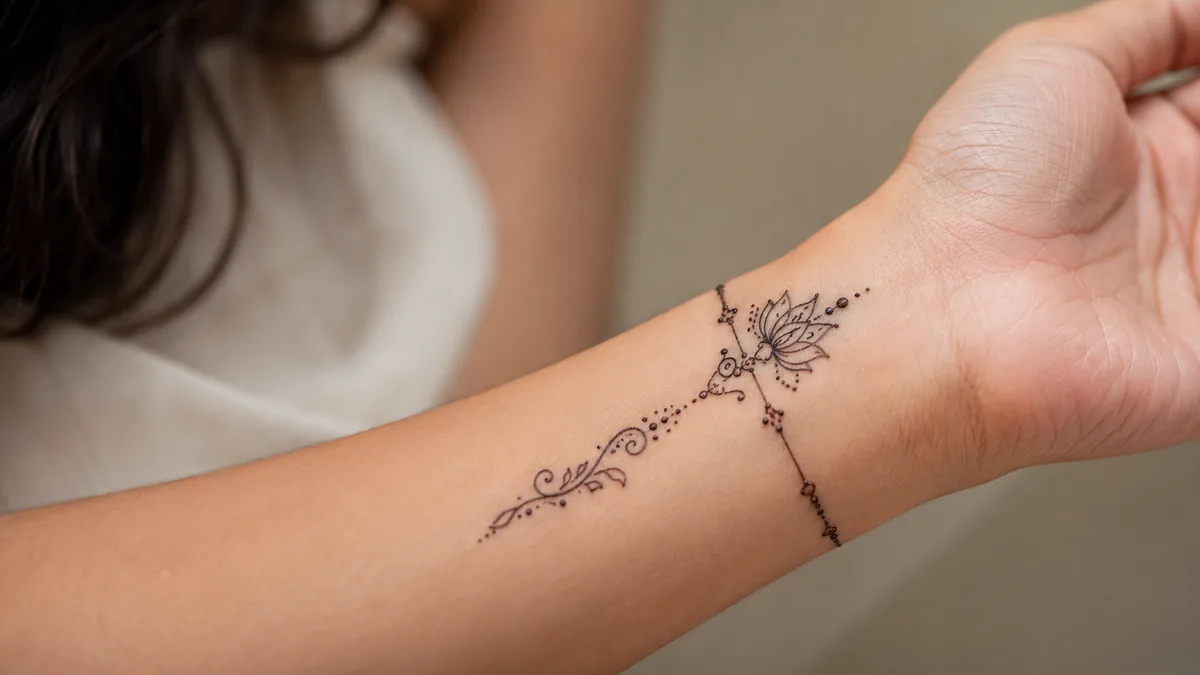
10Anchored the palm with one paisley
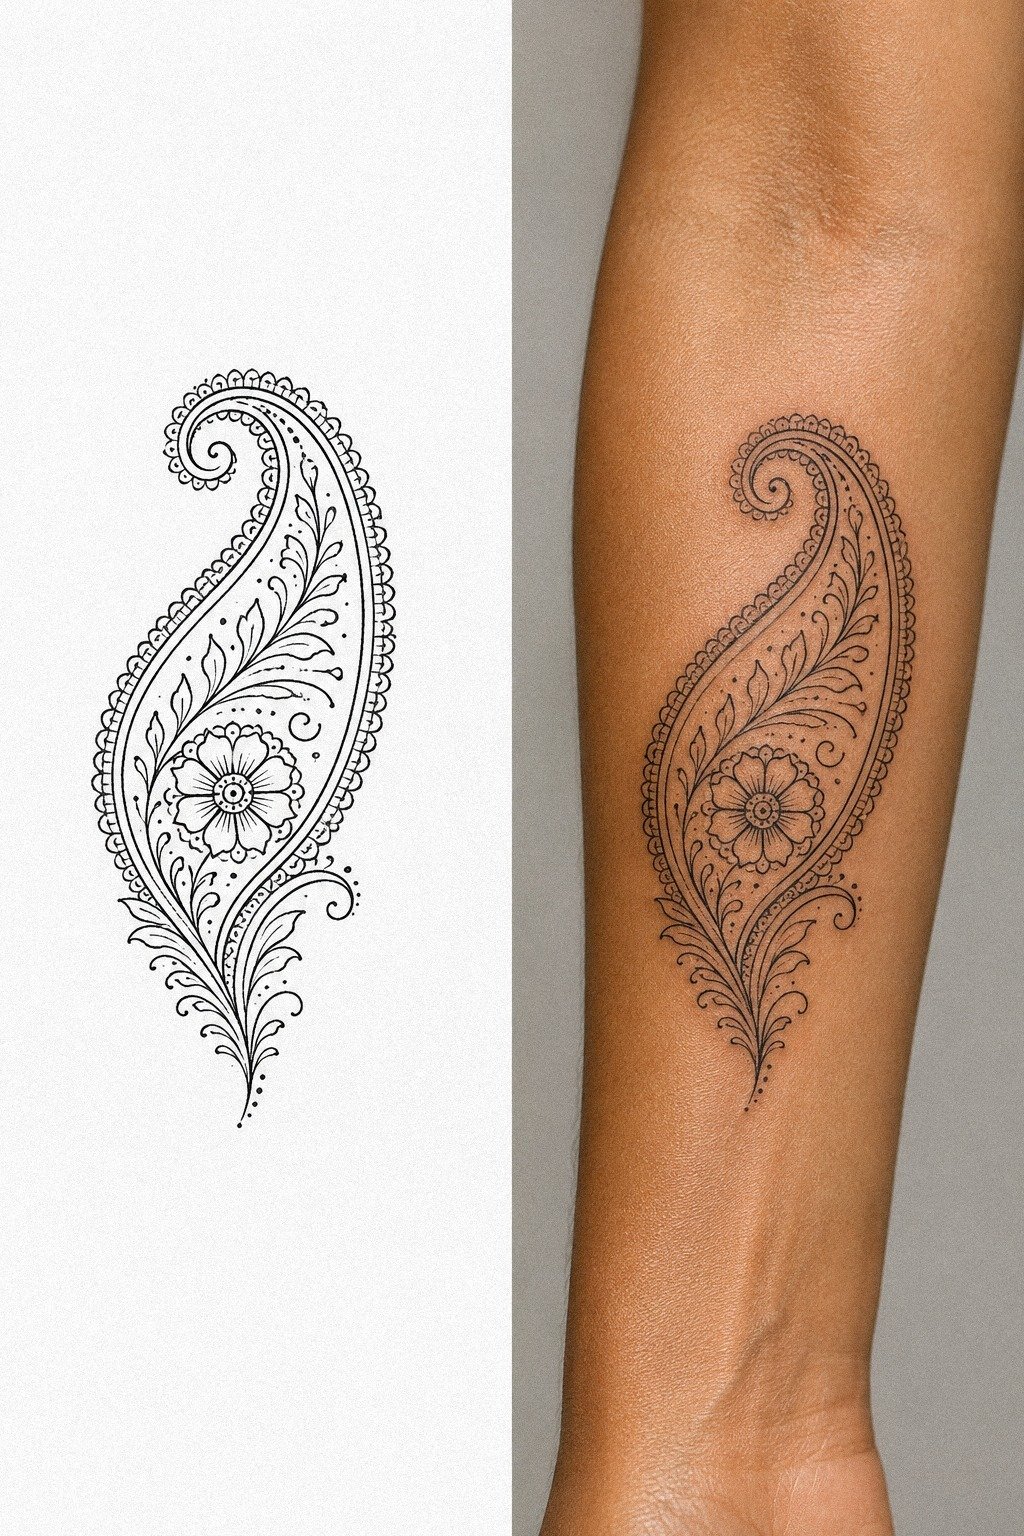
I did not want a full palm fill, but I did want one focal mark.
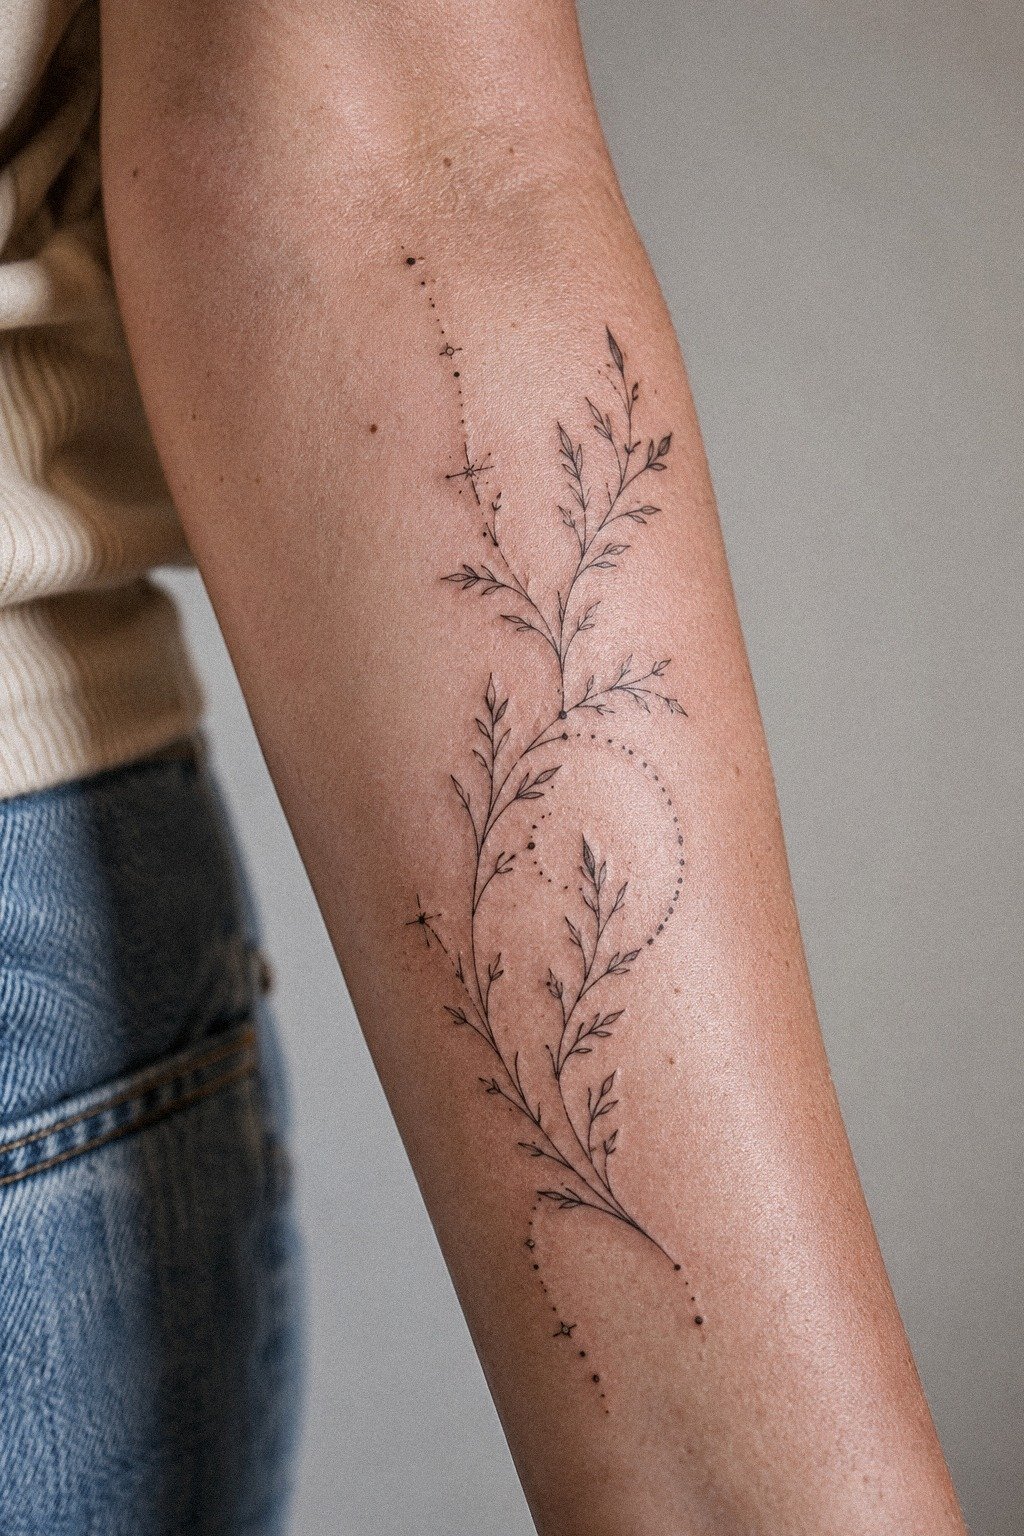
11Extended the design toward my forearm
Once the wrist started reading like a bracelet, I knew the tattoo needed a little runway. Extending the design toward my forearm fixed that. It gave the whole composition direction and stopped the hand from feeling visually cut off at the wrist crease.
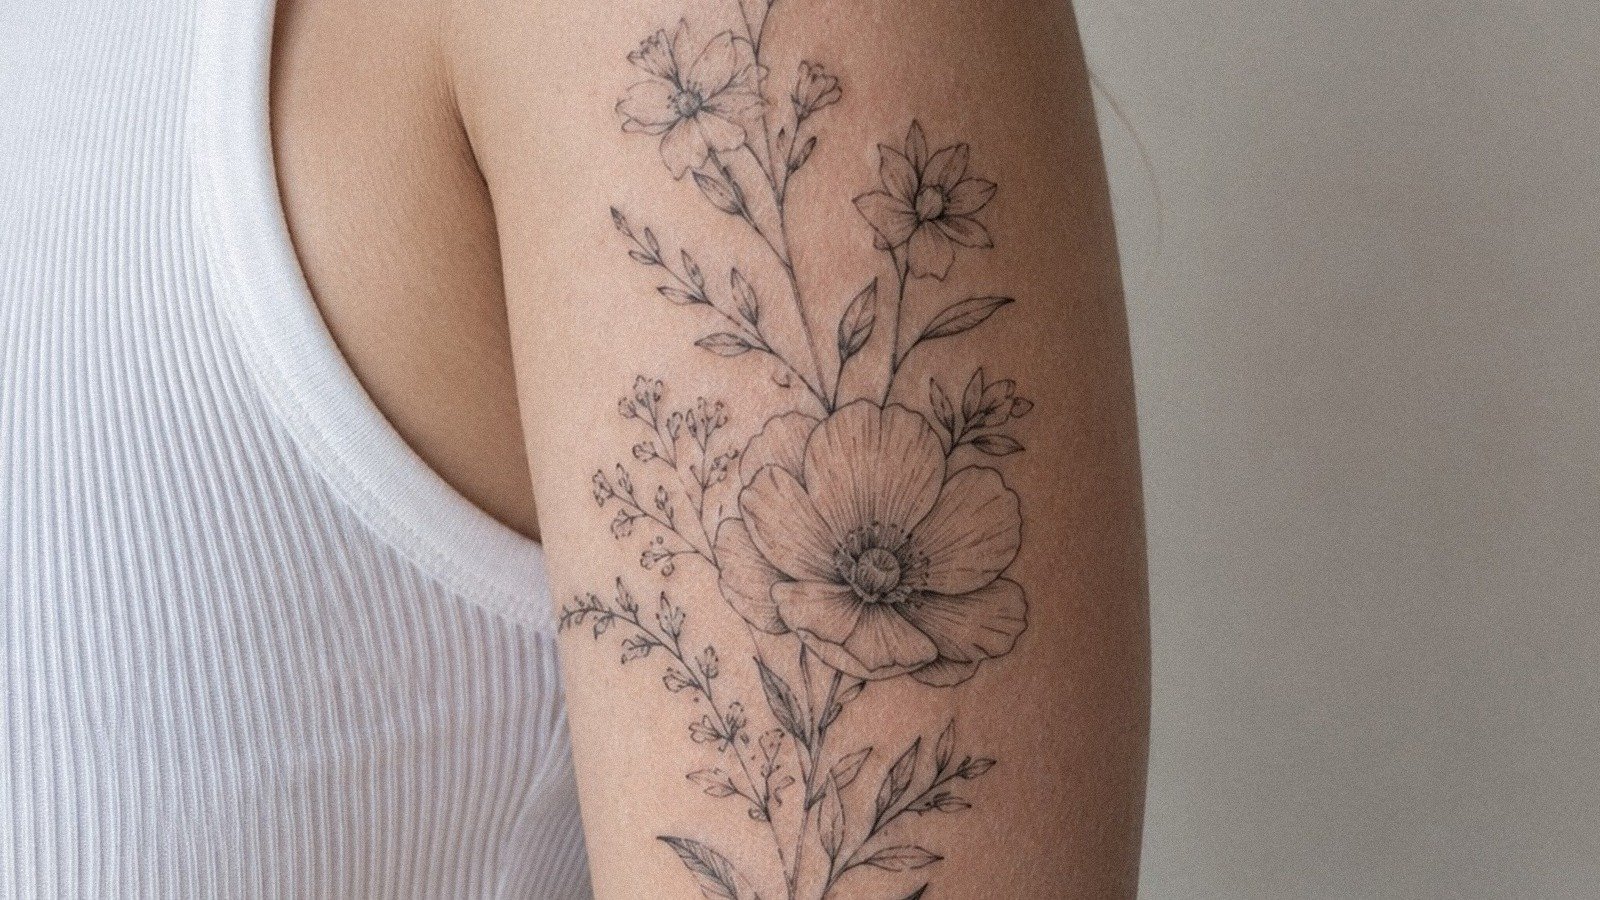
This works especially well on deep brown skin with warm undertones because a slim forearm extension lets the black linework stay clean and legible in natural light. I kept the extension narrow, almost like a trailing vine with occasional leaf bursts, so it didn’t turn into a sleeve situation by accident. If you want a softer version of that flow, modern mehndi designs is full of layouts that use spacing well instead of just adding more motif.
12Kept the fingertips dark and simple
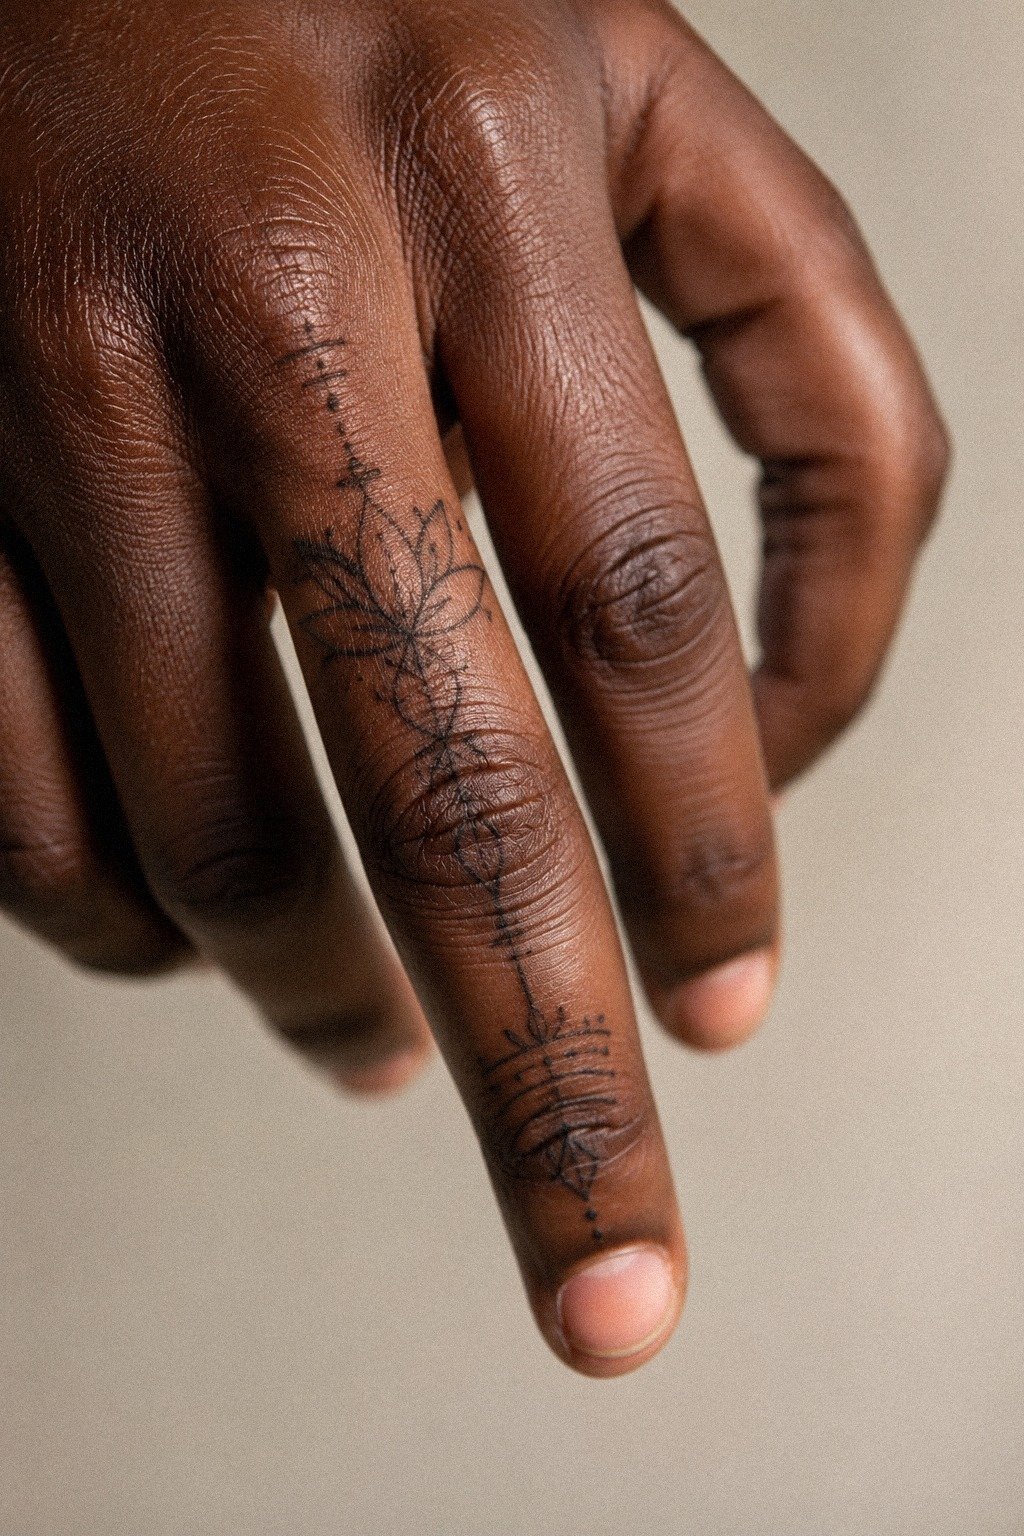
Dark fingertips are one of those details you either commit to or skip. I committed, but only in a stripped-back way. No heavy blocks, no muddy fills, just enough darkness at the tips to frame the finer lines below and make the whole design feel finished.
This is where solid packing matters. Get it bright in one solid pass, not scratch at it fifty times.
Fingertips are high-wear, high-friction skin, so overworking them is a fast way to get patchy healing. On deep ebony skin, that simple dark edge looked strong because the surrounding linework stayed light.
Bold will hold, but only if you know where to use the bold. For tiny-line longevity, fine-line tattoo needles and longevity is the guide I send before fingertip work.
13Checked how the lines photographed outside
Studio light lies a little. Outside light tells the truth. I always check a fresh mehndi-inspired tattoo in indirect daylight because that’s when you see whether the lines are crispy, whether the spacing reads, and whether the whole thing still looks elegant once the skin isn’t being flattered by ring lights.
This matters for fair cool-pink skin especially, where redness can make fresh tattoos look blurrier than they are. Healed linework should read from wrist to elbow without turning into visual static.
I stepped outside, looked at my arm from a few feet back, and knew the tiny wrist florals had been the right call. They gave the design a clear entry point in every photo.
And yes, if your tattoo only looks good cropped tight for social, that is a problem. I make people compare that with small tattoo ideas that stay readable before we lock a stencil.
14Saved the easiest design for touch ups
The smartest move I made was leaving myself one easy future fix. Instead of building the most delicate section into the hardest spot, I kept the simplest band and vine details in places that would be quick to refresh. That matters with hand tattoos, full stop.
Hands and fingers are for people who accept touch-ups. That’s not fear talk. That’s just physics.
High-wear skin fades faster, sun beats on it, and constant movement softens tiny details over time. So if you’re going to do this, plan the maintenance while the design is still on paper.
You don’t need every part of it to be precious. You need the backbone to stay clean. For the healing part nobody loves talking about, tattoo aftercare guide covers the boring stuff that saves sharp work.
The Three-Zone Mehndi Rule
If you’re building a mehndi-inspired tattoo instead of using temporary henna, here’s the decision frame I trust most: break the design into three zones. Zone one is your focal area, usually the hand top or wrist cuff.
Zone two is your connector, like vines, dots, or a slim forearm trail. Zone three is your restraint, the skin you intentionally leave bare so the whole thing doesn’t suffocate itself.
I’ve seen too many clients skip that third zone because empty skin feels unfinished on a screen. On a body, it is what makes the tattoo breathe.
The tiny wrist detail changed everything because it created structure without yelling. I didn’t need a denser center.
I needed a better edge. That is the part people miss when they bring in a saved image and ask for “the same thing, just smaller.” Smaller is not the problem.
Unedited is. If you want Pinterest-exact, I am not your artist.
References are for vibe, spacing, and flow. Your actual design has to fit your tendons, your knuckles, your skin tone, and the way your hand moves when you talk.
That’s the win!
And here’s the honest skin side of it. Lines feel sharper, shading is a dull burn, and solid fingertip packing is the spiciest part.
Most small mehndi-style hand tattoos fall around 1.5 to 3 hours depending on how much finger and wrist work you add, and healing on the surface is usually 2 to 4 weeks if you don’t beat it up. The first few days, treat it like an open wound.
After that, you still need patience. It will peel like a sunburn, then go a little shiny with silver skin before it settles.
Nobody tells you how weird that middle stage looks, but it passes.
But the bigger point is longevity. A simple design is not boring.
It’s the version that still reads in ten years. Black is your best friend for that.
Fine line can age cute on you when the shapes are simple and the spacing is generous. Tiny super-detailed lace on fingers and palms?
That is where you risk mush, blowout, or a whole lot of maintenance. So if you want the soft mehndi feeling without setting money on fire, edit hard, place smart, and let the empty skin do some work. Clean always beats crowded.
Every time!
How much it cost
My final price sat in the normal small hand-tattoo zone because the design stayed fine line, black only, and under half a day of work. In most US shops, you’re looking at an hourly rate around $100 to $250 depending on the artist, city, and whether they specialize in delicate ornamental work. A small mehndi-inspired hand and wrist tattoo usually lands around $150 to $450, while a more built-out hand-to-forearm piece can move toward $500 to $900 if you’re adding multiple zones and a touch-up plan.
Here are the numbers I use as a realistic starting point:
And healing time matters just as much as price. Surface healing is usually 2 to 4 weeks.
Hands may need a check-in if you work with water, gym a lot, or spend all day in the sun. Cheap tattoos get expensive when they need fixing, so I would rather see you buy less detail and better execution.
If you are weighing budget against lifespan, fine-line tattoo needles and longevity is the practical next read.
Why does the Clean Hand Test matter?
Here is my quick filter before I book or approve any mehndi-inspired hand piece: step outside, relax your hand, and look at it from a few feet back. If your eye can’t find the wrist start, the finger flow, and one clear focal accent in about 2 seconds, the design probably needs editing.
That’s the Clean Hand Test. It keeps you from paying extra for detail nobody will ever read.
It also protects your healing. Simpler spacing means less overworked skin, easier aftercare, and fewer spots where little flakes can get picked off by accident. Clean wins again!
What People Always Want to Know
What is the best Latest Simple Mehndi Designs for a small forearm?
A slim wrist cuff plus a light trailing vine is the best starting point for a small forearm because it gives you clear flow without crowding the skin. Clean black linework.
Open petals. One focal mandala, not five.
And yes, you can steal the vibe from modern mehndi designs.
Where can I buy Latest Simple Mehndi Designs pieces on a budget?
If you’re talking real mehndi looks, don’t shop furniture stores, shop the right artist instead. Look for clean healed work on tattoo portfolios, then compare shop minimums.
Flash day sheets. Apprentice specials from reputable studios.
Temporary practice cones only if you’re testing placement before you commit.
How much does a Latest Simple Mehndi Designs makeover cost?
For a tattoo version, about $150 to $700 is the normal range depending on size, finger coverage, and your artist’s rate. Small wrist-first layouts cost less.
Added forearm flow costs more. The free part is editing the design before you ever sit down.
Can I create a Latest Simple Mehndi Designs on a budget?
Yes, and the best budget move is keeping it simple enough to heal well. One wrist band.
A few finger vines. Black ink only.
Skip full palm fill. Give the artist a clean vibe board instead of twenty conflicting screenshots, and you’ll spend less fixing bad choices later.
Is a Latest Simple Mehndi Designs worth it in a small space?
Yes, especially on a smaller hand or forearm, because limited skin forces you into better spacing. The design breathes more.
The motifs read cleaner. Bump tiny details up the forearm if your wrist feels cramped, and it will age nicer too.
Is Latest Simple Mehndi Designs a good idea for a rental?
For skin, not walls, yes, if you accept maintenance. Mehndi-inspired hand tattoos are a good idea when you want ornament without heavy coverage.
Removable option first: temporary henna or stencil placement test. Permanent option second: fine line blackwork with touch-up expectations built in.
The Wrist-First Rule
If I had to pick one, I’d start with the tiny wrist florals. They create the edge that keeps the whole design from collapsing into filler. Nail that cuff first, and your fingers, palm accent, and forearm trail all make more sense.